启程 Spring AI中文文档
Spring AI 学习环境 开发工具:IntelliJ IDEA Ultimate 或 VSCode
AI的主要分支
机器学习(Machine Learning):使计算机能够从数据中学习,而无需明确编程。
深度学习(Deep Learning):基于人工神经网络的机器学习子集,能处理更复杂的数据模式。
自然语言处理(NLP):使计算机能够理解、解释和生成人类语言。
计算机视觉(Computer Vision):使计算机能够”看到”并理解视觉信息。
机器人学(Robotics):研究设计、构建和操作机器人的学科。
大语言模型(LLM) 大语言模型(Large Language Models,简称LLM)基于深度学习的模型,通过分析大量文本数据学习语言模式和知识。
预训练-微调范式:
Transformer架构:
大规模参数:
自监督学习:
AI 术语
提示词(Prompt)
1
2
String prompt="请为剪切助手应用编写一个简短的产品描述,强调其跨设备同步功能。" ; String response aiModel.generateText(prompt);
模型(Model)
标记(Token)
嵌入(Embedding)
1 2 3 4 5 6 7 8 9 10 11 12 13 14 15 16 17 18 19 20 21 22 23 24 25 26 27 public class TextEmbedding { private EmbeddingModel model; public TextEmbedding (EmbeddingModel model) { this .model = model; } public double [] getEmbedding(String text) { return model.embed(text); } public double calculateSimilarity (String text1, String text2) { double [] embedding1 = getEmbedding(text1); double [] embedding2 = getEmbedding(text2); return cosineSimilarity(embedding1, embedding2); } private double cosineSimilarity (double [] v1, double [] v2) { return 0.87 ; } }
温度(Temperature)
微调(Fine-tuning)
上下文窗口(Context Window)
推理(Inference)
RAG(检索增强生成)
1 2 3 4 5 6 7 8 9 10 11 12 13 14 15 16 17 18 19 20 21 22 23 24 25 26 27 28 29 public class RAGSystem { private DocumentStore documentStore; private EmbeddingModel embeddingModel; private LLMClient llmClient; public String answerQuestion (String question) { double [] questionEmbedding = embeddingModel.embed(question); List<Document> relevantDocs = documentStore.searchSimilar(questionEmbedding, 3 ); StringBuilder contextBuilder = new StringBuilder (); for (Document doc : relevantDocs) { contextBuilder.append(doc.getContent()).append("\n\n" ); } String prompt = "基于以下信息回答问题:\n\n" + contextBuilder.toString() + "\n\n问题:" + question; return llmClient.generateText(prompt); } }
Spring 框架 Spring核心框架是整个Spring生态系统的基础.
SpringBoot
Spring Data
Spring Security
Spring Cloud
Spring Integration Spring Batch
框架与库(Library)的区别在于控制权的反转:
1 2 3 4 5 6 7 8 9 10 11 12 13 14 15 16 17 public void libraryExample () { String text = "编程导航欢迎你" ; System.out.println(StringUtils.capitalize(text)); } @Component public class FrameworkExample { @PostConstruct public void init () { System.out.println("面试鸭系统初始化完成" ); } }
RESTful API基础 RESTful API(Representational State Transfer API)
REST的核心原则
资源(Resources):系统的核心是资源,每个资源都有一个唯一的标识符(URI)。
表示(Representations):资源可以有多种表示形式,如JSON、XML、HTML等。
状态转移(State Transfer):通过HTTP方法(GET、POST、PUT、DELETE等)对资源执行操作。
无状态(Stateless):服务器不保存客户端状态,每个请求都包含了服务器处理该请求所需的全部信息。
统一接口(Uniform Interface):所有资源都遵循相同的接口约束。
RESTful API设计最佳实践
使用HTTP方法表示操作:
使用HTTP状态码表示结果:
使用名词复数表示资源集合:
使用子资源表示关系:
使用查询参数进行过滤、排序和分页:
Spring Boot中实现RESTful API
1
2
3
4
5
6
7
8
9
10
11
12
13
14
15
16
17
18
19
20
21
22
23
24
25
26
27
28
29
30
31
32
33
34
35
36
37
38
39
40
41
42
43
44
45
46
47
48
49
50
51
52
53
54
55
56
@RestController @RequestMapping("/api/articles") public class ArticleController { private final ArticleService articleService; public ArticleController (ArticleService articleService) { this .articleService = articleService; } @GetMapping public List<Article> getAllArticles () { return articleService.findAll(); } @GetMapping("/{id}") public ResponseEntity<Article> getArticleById (@PathVariable Long id) { return articleService.findById(id) .map(article -> ResponseEntity.ok(article)) .orElse(ResponseEntity.notFound().build()); } @PostMapping public ResponseEntity<Article> createArticle (@RequestBody Article article) { Article savedArticle = articleService.save(article); URI location = ServletUriComponentsBuilder.fromCurrentRequest() .path("/{id}" ) .buildAndExpand(savedArticle.getId()) .toUri(); return ResponseEntity.created(location).body(savedArticle); } @PutMapping("/{id}") public ResponseEntity<Article> updateArticle (@PathVariable Long id, @RequestBody Article article) { if (!articleService.existsById(id)) { return ResponseEntity.notFound().build(); } article.setId(id); Article updatedArticle = articleService.save(article); return ResponseEntity.ok(updatedArticle); } @DeleteMapping("/{id}") public ResponseEntity<Void> deleteArticle (@PathVariable Long id) { if (!articleService.existsById(id)) { return ResponseEntity.notFound().build(); } articleService.deleteById(id); return ResponseEntity.noContent().build(); } }
请求和响应格式
1
2
3
4
5
6
7
8
9
POST /api/articles Content-Type: application/json { "title" : "Spring Boot 实战" , "content" : "Spring Boot 让 Java 开发变得更简单..." , "author" : "程序员鱼皮" , "tags" : ["Spring" , "Java" , "教程" ] }
响应示例:
1 2 3 4 5 6 7 8 9 10 11 12 HTTP/1.1 201 Created Location: /api/articles/123 Content-Type: application/json { "id" : 123 , "title" : "Spring Boot 实战" , "content" : "Spring Boot 让 Java 开发变得更简单..." , "author" : "程序员鱼皮" , "tags" : ["Spring" , "Java" , "教程" ], "createdAt" : "2023-05-20T10:30:00Z" }
Spring AI 简化人工智能和机器学习在Spring应用中的集成,使开发者能更容易地利用AI技术构建智能应用。
复杂性封装:隐藏与A1服务交互的复杂性,提供简洁的API。
统一接口:为不同的Al提供商(如OpenAl、Anthropic、.本地模型等)提供统一的接口。
技术整合:将Al功能与Spring生态系统无缝集成。
降低门槛:使企业级开发者能够轻松采用A!技术。
模型抽象层 Spring Al定义了统一的接口来访问不同的Al模型:
ChatClient:用于与聊天模型交互,如GPT、Claude等。
EmbeddingClient:用于生成文本嵌入向量。
ImageClient:用于图像生成和处理。
提示词管理 Spring Al提供了强大的提示词管理功能:
PromptTemplate:用于创建动态提示词模板。
SystemPromptTemplate:专门用于系统消息的模板。
UserPromptTemplate:用于用户消息的模板。
AI模型提供商
OpenAI
Anthropic
Ollama
Spring AI的工作流程
配置AI客户端:设置必要的认证信息和选项。
准备提示词:构建用于AI模型的提示词。
调用AI服务:发送提示词并获取响应。
处理响应:解析和使用A!生成的内容。
1
2
3
4
5
6
7
8
9
10
11
12
13
14
15
16
17
18
19
20
21
22
23
24
25
26
27
@RestController @RequestMapping("/api/assistant") public class AssistantController { private final ChatClient chatClient; public AssistantController (ChatClient chatClient) { this .chatClient = chatClient; } @PostMapping("/chat") public ResponseEntity<Map<String, String>> chat (@RequestBody Map<String, String> request) { String userMessage = request.get("message" ); String answer = chatClient.prompt() .system("你是编程导航的专业助手,专门帮助用户解决编程相关问题。请提供准确、实用的建议。" ) .user(String.format("请回答这个编程问题:%s" , userMessage)) .call() .content(); Map<String, String> responseBody = new HashMap <>(); responseBody.put("response" , answer); return ResponseEntity.ok(responseBody); } }
大型语言模型(LLM)
Spring AI相关配置
API密钥:https://platform.openai.com/ https://www.anthropic.com/product
开发时注意事项:
1 2 3 4 5 6 7 8 9 10 @Bean public ChatClient chatClient (OpenAiChatModel chatModel) { return ChatClient.builder(chatModel).build(); } @Bean public OpenAiChatModel openAiChatModel (@Value("${openai.api-key}") String apiKey) { return OpenAiChatModel.builder().apiKey(apiKey).build(); }
本地开发工具选择
Ollama(用于本地运行开源模型):brew instal1ol1ama(macOS)
1
2
3
4
5
6
7
# 安装 Ollama 并下载模型 # macOS/Linux curl -fsSL https: ollama pull llama3 # 运行服务 ollama serve
使用Spring Initializr创建Spring AI项目
使用Spring Initializr 创建项目
添加Spring AI依赖
1 2 3 4 5 6 7 8 9 <dependencies > <dependency > <groupId > org.springframework.ai</groupId > <artifactId > spring-ai-starter-model-openai</artifactId > <version > 1.0.0</version > </dependency > </dependencies >
创建AI服务
1
2
3
4
5
6
7
8
9
10
11
12
13
14
15
16
17
18
@Service public class AIAssistantService { private final ChatClient chatClient; @Autowired public AIAssistantService (ChatClient chatClient) { this .chatClient = chatClient; } public String askQuestion (String question) { return chatClient.prompt() .system("你是编程导航的助手,擅长回答编程相关问题。" ) .user(question) .call() .content(); } }
开发环境搭建 Maven依赖配置
添加Spring AI BOM(Bill of Materials)
1 2 3 4 5 6 7 8 9 10 11 <dependencyManagement > <dependencies > <dependency > <groupId > org.springframework.ai</groupId > <artifactId > spring-ai-bom</artifactId > <version > 1.0.0</version > <type > pom</type > <scope > import</scope > </dependency > </dependencies > </dependencyManagement >
添加Spring AI基础依赖
1 2 3 4 5 6 7 8 9 10 11 12 <dependencies > <dependency > <groupId > org.springframework.boot</groupId > <artifactId > spring-boot-starter-web</artifactId > </dependency > <dependency > <groupId > org.springframework.ai</groupId > <artifactId > spring-ai-core</artifactId > </dependency > </dependencies >
添加特定提供商的依赖
1 2 3 4 5 6 7 8 9 10 11 12 13 14 15 16 17 18 19 20 <dependency > <groupId > org.springframework.ai</groupId > <artifactId > spring-ai-starter-model-openai</artifactId > <version > 1.0.0</version > </dependency > <dependency > <groupId > org.springframework.ai</groupId > <artifactId > spring-ai-starter-model-anthropic</artifactId > <version > 1.0.0</version > </dependency > <dependency > <groupId > org.springframework.ai</groupId > <artifactId > spring-ai-starter-model-ollama</artifactId > <version > 1.0.0</version > </dependency >
添加向量存储支持(如果需要RAG功能)
1 2 3 4 5 6 7 8 9 10 <dependency > <groupId > org.springframework.ai</groupId > <artifactId > spring-ai-pgvector-store</artifactId > </dependency > <dependency > <groupId > org.springframework.ai</groupId > <artifactId > spring-ai-redis-store</artifactId > </dependency >
获取密钥 本地部署
下载ollama
速度慢,复制下载链接到任意网盘软件下载
ollama安装路径更改代码.\download_OllamaSetup.exe /DIR=E:\Ollama
系统环境变量设置:OLLAMA_MODELS = D:\ollamaimagers
下载模型:魔搭平台
选择DeepSeek-R1-Distill-Qwen-7B-GGUF(必须是GGUF,否则需要转换)
DeepSeek-R1-Distill-Qwen-7B-F16.gguf
ModelFile(dsr1-7b.txt)
1
2
3
4
5
6
7
8
9
10
11
12
13
14
15
16
17
18
19
20
21
22
23
24
25
26
27
FROM ./DeepSeek-R1-Distill-Qwen-7B-F16.gguf PARAMETER temperature 0.7 PARAMETER top_p 0.95 PARAMETER top_k 40 PARAMETER repeat_penalty 1.1 PARAMETER min_p 0.05 PARAMETER num_ctx 1024 PARAMETER num_thread 4 PARAMETER num_gpu 8 # 设置对话终止符 PARAMETER stop "<|begin▁of▁sentence|>" PARAMETER stop "<|end▁of▁sentence|>" PARAMETER stop "<|User|>" PARAMETER stop "<|Assistant|>" SYSTEM """ """ TEMPLATE """{{- if .System }}{{ .System }}{{ end }} {{- range $i, $_ := .Messages }} {{- $last := eq (len (slice $.Messages $i)) 1}} {{- if eq .Role "user" }}<|User|>{{ .Content }} {{- else if eq .Role "assistant" }}<|Assistant|>{{ .Content }}{{- if not $last }}<|end▁of▁sentence|>{{- end }} {{- end }} {{- if and $last (ne .Role "assistant") }}<|Assistant|>{{- end }} {{- end }}"""
创建模型:ollama create wgai-r1:7b -f ./dsr1-7b.txtollama listollama run wgai-r1:7b
启动服务:ollama serve
API密钥安全管理最佳实践
使用环境变量:
1 2 OPENAI_API_KEY =sk-your-key-here
1
2
- 通过环境变量传递 API 密钥 - 在本地开发中使用 `.env` 文件(记得将其添加到 .gitignore)
在Spring Boot中使用配置:
1
2
# application.properties 或 application.yml spring.ai.openai.api-key=${OPENAI_API_KEY}
使用加密配置:Spring Cloud Config 和Vault 等服务
应用适当的速率限制:
1 2 3 4 5 6 7 8 9 10 11 12 13 @Configuration public class AIConfig { @Value("${spring.ai.openai.api-key}") private String apiKey; @Bean public ChatClient openAiChatClient (OpenAiChatModel chatModel) { return ChatClient.builder(chatModel) .build(); } }
第一次实践 添加依赖:
1 2 3 4 5 <dependency > <groupId > org.springframework.ai</groupId > <artifactId > spring-ai-starter-model-ollama</artifactId > <version > 1.0.0</version > </dependency >
set WGAI-API-KEY=密钥
1
2
3
4
5
6
7
8
9
spring.application.name=Spring-ai-demo # OpenAI #server.port=8080 #spring.ai.api-key=${WGAI-API-KEY} #spring.ai.chat.model=wgai-r1:1. 5b # Ollama spring.ai.ollama.base-url=http: spring.ai.ollama.chat.model=wgai-r1:1. 5b
1
2
3
4
5
6
7
8
9
10
11
12
13
14
15
16
17
18
19
20
21
22
23
package com.example.Spring_ai_demo;import org.springframework.ai.chat.client.ChatClient;import org.springframework.beans.factory.annotation.Autowired;import org.springframework.web.bind.annotation.GetMapping;import org.springframework.web.bind.annotation.RequestParam;import org.springframework.web.bind.annotation.RestController;@RestController public class TestController { private final ChatClient chatClient; @Autowired public TestController (ChatClient chatClient) { this .chatClient = chatClient; } @GetMapping("/test") public String testAI (@RequestParam(defaultValue = "你好,Spring AI!") String message) { return chatClient.prompt().user(message).call().content(); } }
1
2
3
4
5
6
7
8
9
10
11
12
13
14
package com.example.Spring_ai_demo;import org.springframework.ai.chat.client.ChatClient;import org.springframework.context.annotation.Bean;import org.springframework.context.annotation.Configuration;@Configuration public class AiConfig { @Bean public ChatClient chatClient (ChatClient.Builder builder) { return builder.build(); } }
启动测试:http://localhost:8080/test
练习 练习1:实现API密钥轮换机制
1
2
3
4
5
6
7
8
9
10
11
12
13
14
15
16
17
18
19
20
@Configuration public class AIClientConfig { @Value("${api.keys}") private List<String> apiKeys; private AtomicInteger currentKeyIndex = new AtomicInteger (0 ); @Bean public ChatClient chatClient () { String currentKey = getNextApiKey(); return new OpenAiChatClient (currentKey); } private String getNextApiKey () { int index = currentKeyIndex.getAndUpdate(i -> (i + 1 ) % apiKeys.size()); return apiKeys.get(index); } }
练习2:创建开发/生产环境配置分离
1
2
3
4
5
6
7
8
9
10
11
12
13
14
15
@Configuration public class AIClientConfiguration { @Bean @Profile("dev") public ChatClient devChatClient (OllamaChatModel chatModel) { return ChatClient.builder(chatModel).build(); } @Bean @Profile("prod") public ChatClient prodChatClient (OpenAiChatModel chatModel) { return ChatClient.builder(chatModel).build(); } }
Spring AI 模型 项目结构 1 2 3 4 5 6 7 8 9 10 11 12 13 14 15 16 17 18 19 20 21 22 my-spring-ai-app/ ├── src/ │ ├── main/ │ │ ├── java/ │ │ │ └── com/example/myapp/ │ │ │ ├── MySpringAiApplication.java # 主应用类 │ │ │ ├── config/ # 配置类 │ │ │ │ └── AiConfig.java # AI 相关配置 │ │ │ ├── controller/ # 控制器 │ │ │ │ └── ChatController.java # 处理聊天请求 │ │ │ ├── service/ # 服务层 │ │ │ │ └── AiService.java # AI 服务 │ │ │ ├── model/ # 数据模型 │ │ │ │ ├── ChatRequest.java # 请求模型 │ │ │ │ └── ChatResponse.java # 响应模型 │ │ │ └── exception/ # 异常处理 │ │ │ └── AiServiceException.java # AI 服务异常 │ │ └── resources/ │ │ ├── application.properties # 应用配置 │ │ └── static / # 静态资源 │ └── test/ # 测试代码 └── pom.xml # Maven 配置
AI配置类:配置AI客户端和相关设置。
1 2 3 4 5 6 7 8 @Configuration public class AiConfig { @Bean public ChatClient openAiChatClient (OpenAiChatModel chatModel) { return ChatClient.builder(chatModel).build(); } }
AI服务类:封装AI功能逻辑。
1 2 3 4 5 6 7 8 9 10 11 12 13 @Service public class AiService { private final ChatClient chatClient; public AiService (ChatClient chatClient) { this .chatClient = chatClient; } public String generateResponse (String prompt) { return chatClient.prompt().user(prompt).call().content(); } }
控制器:提供HTTP接口。
1 2 3 4 5 6 7 8 9 10 11 12 13 14 15 16 @RestController @RequestMapping("/api/chat") public class ChatController { private final AiService aiService; public ChatController (AiService aiService) { this .aiService = aiService; } @PostMapping public ChatResponse chat (@RequestBody ChatRequest request) { String response = aiService.generateResponse(request.getMessage()); return new ChatResponse (response); } }
配置 配置文件(application.properties)设置
1 2 3 4 5 6 7 8 9 10 11 12 13 14 15 16 17 18 # 应用基本配置 server.port=8080 spring.application.name=spring-ai-demo # OpenAI 配置 spring.ai.openai.api-key=${OPENAI_API_KEY} spring.ai.openai.chat.options.model = gpt-3.5 -turbo spring.ai.openai.chat.options.temperature =0.7 spring.ai.openai.chat.options.top-p=1.0 spring.ai.openai.chat.options.max-tokens=2000 # Ollama spring.ai.ollama.base-url=http: spring.ai.ollama.chat.model=wgai-r1:1. 5b spring.ai.ollama.chat.options.model=wgai-r1:7b # 超时设置 spring.ai.ollama.init.timeout = 60000
1 2 3 4 5 6 7 8 9 10 11 12 13 14 15 16 17 18 19 server: port: 8080 spring: application: name: spring-ai-demo ai: openai: api-key: ${OPENAI_API_KEY} chat: model: gpt-3.5-turbo temperature: 0.7 top-p: 1.0 max-tokens: 2000 timeout: connect: 60000 read: 60000
多环境配置
1 2 3 4 5 6 7 8 9 spring.ai.ollama.base-url=http://localhost:11434 spring.ai.ollama.chat.options.model=wgai-r1:1.5b logging.level.org.springframework.ai.chat.client.advisor=DEBUG spring.ai.openai.chat.options.model=gpt-4 logging.level.org.springframework.ai.chat.client.advisor=false
然后在主配置文件中指定当前激活的配置文件:
1 spring.profiles.active=dev
创建控制器处理HTTP请求 在Web应用中,我们需要创建控制器来处理前端或其他服务发送的HTTP请求。
1 2 3 4 5 6 7 8 9 10 11 12 13 14 15 16 17 18 19 20 21 22 23 24 25 26 27 28 29 30 31 32 33 34 35 36 37 38 39 40 41 42 43 44 45 46 47 48 49 50 51 52 53 54 @RestController @RequestMapping("/api/chat") public class ChatController { private final AiService aiService; public ChatController (AiService aiService) { this .aiService = aiService; } @PostMapping public ResponseEntity<ChatResponse> chat (@RequestBody ChatRequest request) { try { String response = aiService.generateResponse(request.getMessage()); ChatResponse chatResponse = new ChatResponse (response); return ResponseEntity.ok(chatResponse); } catch (Exception e) { return ResponseEntity.status(HttpStatus.INTERNAL_SERVER_ERROR) .body(new ChatResponse ("处理请求时出错:" + e.getMessage())); } } @PostMapping("/stream") public SseEmitter streamChat (@RequestBody ChatRequest request) { SseEmitter emitter = new SseEmitter (300000L ); try { aiService.streamResponse(request.getMessage(), emitter); } catch (Exception e) { emitter.completeWithError(e); } return emitter; } } public class ChatRequest { private String message; } public class ChatResponse { private String content; private LocalDateTime timestamp; public ChatResponse (String content) { this .content = content; this .timestamp = LocalDateTime.now(); } }
流式响应处理
1 2 3 4 5 6 7 8 9 10 11 12 13 14 15 16 17 18 19 20 21 22 23 24 25 26 27 28 29 30 @Service public class AiService { private final ChatClient chatClient; public void streamResponse (String prompt, SseEmitter emitter) { Prompt chatPrompt = new Prompt (new UserMessage (prompt)); chatClient.stream(chatPrompt) .subscribe( chunk -> { try { String content = chunk.getResult().getOutput().getContent(); if (content != null && !content.isEmpty()) { emitter.send(SseEmitter.event().data(content)); } } catch (IOException e) { emitter.completeWithError(e); } }, error -> emitter.completeWithError(error), () -> emitter.complete() ); } }
实现简单的文本生成功能
内容摘要生成器
1 2 3 4 5 6 7 8 9 10 11 12 13 14 15 16 17 18 @Service public class SummaryService { private final ChatClient chatClient; public SummaryService (ChatClient chatClient) { this .chatClient = chatClient; } public String summarizeText (String text, int maxWords) { String prompt = String.format( "请将以下文本总结为不超过 %d 个字的摘要:\n\n%s" , maxWords, text ); return chatClient.prompt().user(prompt).call().content(); } }
代码解释器
1 2 3 4 5 6 7 8 9 10 11 12 13 14 15 16 17 18 19 @Service public class CodeExplainerService { private final ChatClient chatClient; public CodeExplainerService (ChatClient chatClient) { this .chatClient = chatClient; } public String explainCode (String code, String language) { String systemPrompt = "你是代码小抄的代码解释专家,请详细解释以下代码的功能和关键部分" ; return chatClient.prompt() .system(systemPrompt) .user(String.format("```%s\n%s\n```" , language, code)) .call() .content(); } }
个性化邮件生成器
1 2 3 4 5 6 7 8 9 10 11 12 13 14 15 16 17 18 19 20 @Service public class EmailGeneratorService { private final ChatClient chatClient; public EmailGeneratorService (ChatClient chatClient) { this .chatClient = chatClient; } public String generateEmail (String recipient, String subject, String keyPoints, String tone) { String prompt = String.format( "请生成一封发给%s的邮件,主题是" %s"。\n" + "需要包含的要点:%s\n" + "语气风格:%s" , recipient, subject, keyPoints, tone ); return chatClient.prompt().user(prompt).call().content(); } }
错误处理与异常管理 定义自定义异常
1 2 3 4 5 6 7 8 9 10 11 12 13 14 15 16 17 18 19 20 21 22 23 24 25 26 public class AiServiceException extends RuntimeException { public AiServiceException (String message) { super (message); } public AiServiceException (String message, Throwable cause) { super (message, cause); } } public class AiTokenLimitExceededException extends AiServiceException { public AiTokenLimitExceededException (String message) { super (message); } } public class AiTimeoutException extends AiServiceException { public AiTimeoutException (String message, Throwable cause) { super (message, cause); } }
异常处理服务
1 2 3 4 5 6 7 8 9 10 11 12 13 14 15 16 17 18 19 20 21 22 23 24 25 26 27 28 29 30 31 32 33 34 35 36 37 38 39 40 41 42 @Service public class AiService { private final ChatClient chatClient; private final int maxRetries; public AiService (ChatClient chatClient, @Value("${ai.max-retries:3}") int maxRetries) { this .chatClient = chatClient; this .maxRetries = maxRetries; } public String generateResponseWithRetry (String prompt) { int attempts = 0 ; while (attempts < maxRetries) { try { return chatClient.prompt().user(prompt).call().content(); } catch (Exception e) { attempts++; if (attempts >= maxRetries) { if (e instanceof ResourceAccessException) { throw new AiTimeoutException ("AI 服务请求超时" , e); } else { throw new AiServiceException ("调用 AI 服务失败" , e); } } try { Thread.sleep(1000 * attempts); } catch (InterruptedException ie) { Thread.currentThread().interrupt(); throw new AiServiceException ("重试过程被中断" , ie); } } } throw new AiServiceException ("超过最大重试次数" ); } }
全局异常处理
1 2 3 4 5 6 7 8 9 10 11 12 13 14 15 16 17 18 19 20 21 22 23 24 25 26 27 28 29 30 31 32 33 34 35 36 37 38 39 40 41 42 43 44 45 46 47 48 49 50 51 52 53 54 55 @RestControllerAdvice public class GlobalExceptionHandler { private static final Logger logger = LoggerFactory.getLogger(GlobalExceptionHandler.class); @ExceptionHandler(AiServiceException.class) public ResponseEntity<ErrorResponse> handleAiServiceException (AiServiceException e) { logger.error("AI 服务异常" , e); ErrorResponse errorResponse = new ErrorResponse ( "AI_SERVICE_ERROR" , e.getMessage() ); return ResponseEntity.status(HttpStatus.SERVICE_UNAVAILABLE).body(errorResponse); } @ExceptionHandler(AiTokenLimitExceededException.class) public ResponseEntity<ErrorResponse> handleTokenLimitException (AiTokenLimitExceededException e) { logger.error("令牌限制异常" , e); ErrorResponse errorResponse = new ErrorResponse ( "TOKEN_LIMIT_EXCEEDED" , "输入内容过长,请缩短后重试" ); return ResponseEntity.status(HttpStatus.BAD_REQUEST).body(errorResponse); } @ExceptionHandler(Exception.class) public ResponseEntity<ErrorResponse> handleGenericException (Exception e) { logger.error("未处理的异常" , e); ErrorResponse errorResponse = new ErrorResponse ( "INTERNAL_SERVER_ERROR" , "服务器内部错误" ); return ResponseEntity.status(HttpStatus.INTERNAL_SERVER_ERROR).body(errorResponse); } } public class ErrorResponse { private String code; private String message; private LocalDateTime timestamp = LocalDateTime.now(); public ErrorResponse (String code, String message) { this .code = code; this .message = message; } }
第二次实践
构建一个AI问答应用
Spring Web
Spring AI
Lombok
配置应用
1 2 3 4 5 6 7 8 9 10 11 server.port=8080 spring.application.name=面试鸭-AI助手 # OpenAI 配置 spring.ai.openai.api-key=${OPENAI_API_KEY} spring.ai.openai.chat.model=gpt-3.5 -turbo spring.ai.openai.chat.temperature=0.7 spring.ai.openai.chat.max-tokens=1500 # 会话设置 app.chat.history-size=10
创建数据模型
1 2 3 4 5 6 7 8 9 10 11 12 13 14 15 16 17 18 19 20 21 22 23 24 25 @Data @NoArgsConstructor @AllArgsConstructor public class Message { private String role; private String content; private LocalDateTime timestamp = LocalDateTime.now(); } @Data @NoArgsConstructor @AllArgsConstructor public class ChatRequest { private String message; private String sessionId; } @Data @NoArgsConstructor @AllArgsConstructor public class ChatResponse { private String message; private List<Message> history; private LocalDateTime timestamp = LocalDateTime.now(); }
实现会话管理服务
1 2 3 4 5 6 7 8 9 10 11 12 13 14 15 16 17 18 19 20 21 22 23 24 25 26 27 28 29 30 31 32 33 @Service public class ChatSessionService { @Value("${app.chat.history-size:10}") private int historySize; private final Map<String, List<Message>> chatSessions = new ConcurrentHashMap <>(); public List<Message> getSessionHistory (String sessionId) { return chatSessions.getOrDefault(sessionId, new ArrayList <>()); } public void addMessage (String sessionId, Message message) { List<Message> history = chatSessions.computeIfAbsent( sessionId, k -> new ArrayList <>() ); history.add(message); if (history.size() > historySize * 2 ) { history = history.subList(history.size() - historySize * 2 , history.size()); chatSessions.put(sessionId, history); } } public String createNewSession () { String sessionId = UUID.randomUUID().toString(); chatSessions.put(sessionId, new ArrayList <>()); return sessionId; } }
实现AI服务
1 2 3 4 5 6 7 8 9 10 11 12 13 14 15 16 17 18 19 20 21 22 23 24 25 26 27 28 29 30 31 32 33 34 35 36 37 38 39 40 41 42 43 44 45 46 47 48 49 50 51 52 53 54 55 56 57 58 59 60 61 62 63 64 65 66 67 68 @Service public class MianshiyaAiService { private final ChatClient chatClient; private final ChatSessionService sessionService; public MianshiyaAiService (ChatClient chatClient, ChatSessionService sessionService) { this .chatClient = chatClient; this .sessionService = sessionService; } public ChatResponse processChat (ChatRequest request) { String sessionId = request.getSessionId(); if (sessionId == null || sessionId.isEmpty()) { sessionId = sessionService.createNewSession(); } Message userMessage = new Message ("user" , request.getMessage()); sessionService.addMessage(sessionId, userMessage); List<Message> history = sessionService.getSessionHistory(sessionId); String aiResponse = chatClient.prompt() .system("你是面试鸭平台的智能助手,专长于回答编程和求职相关的问题。给出准确、简洁且有帮助的回答,必要时提供代码示例。" ) .user(request.getMessage()) .call() .content(); Message assistantMessage = new Message ("assistant" , aiResponse); sessionService.addMessage(sessionId, assistantMessage); return new ChatResponse ( aiResponse, sessionService.getSessionHistory(sessionId), LocalDateTime.now() ); } private List<AbstractMessage> buildMessages (String sessionId) { List<Message> history = sessionService.getSessionHistory(sessionId); List<AbstractMessage> messages = new ArrayList <>(); messages.add(new SystemMessage ( "你是面试平台的智能助手,专长于回答编程和求职相关的问题。" + "给出准确、简洁且有帮助的回答,必要时提供代码示例。" )); int startIndex = Math.max(0 , history.size() - 6 ); for (int i = startIndex; i < history.size(); i++) { Message msg = history.get(i); if ("user" .equals(msg.getRole())) { messages.add(new UserMessage (msg.getContent())); } else if ("assistant" .equals(msg.getRole())) { messages.add(new AssistantMessage (msg.getContent())); } } return messages; } }
实现接口
1 2 3 4 5 6 7 8 9 10 11 12 13 14 15 16 @RestController @RequestMapping("/api/chat") public class ChatController { private final MianshiyaAiService aiService; public ChatController (MianshiyaAiService aiService) { this .aiService = aiService; } @PostMapping public ResponseEntity<ChatResponse> chat (@RequestBody ChatRequest request) { ChatResponse response = aiService.processChat(request); return ResponseEntity.ok(response); } }
创建简单的前端页面(可选)
1 2 3 4 5 6 7 8 9 10 11 12 13 14 15 16 17 18 19 20 21 22 23 24 25 26 27 28 29 30 31 32 33 34 35 36 37 38 39 40 41 42 43 44 45 46 47 48 49 50 51 52 53 54 55 56 57 58 59 60 61 62 63 64 65 66 67 68 69 70 71 72 73 74 75 76 77 78 79 80 81 82 83 84 85 86 87 88 89 90 91 92 93 94 95 96 97 98 99 100 101 102 103 104 105 106 107 108 109 110 111 112 113 114 115 116 117 118 119 120 121 122 123 124 125 126 127 128 <!DOCTYPE html > <html lang ="zh-CN" > <head > <meta charset ="UTF-8" > <meta name ="viewport" content ="width=device-width, initial-scale=1.0" > <title > 微光zc AI 助手</title > <style > body { font-family : 'PingFang SC' , 'Microsoft YaHei' , sans-serif; max-width : 800px ; margin : 0 auto; padding : 20px ; } .chat-container { border : 1px solid #ddd ; border-radius : 8px ; min-height : 400px ; padding : 10px ; margin-bottom : 20px ; overflow-y : auto; } .message { margin-bottom : 10px ; padding : 8px 12px ; border-radius : 18px ; max-width : 70% ; } .user-message { background-color : #e3f2fd ; margin-left : auto; } .assistant-message { background-color : #f1f1f1 ; margin-right : auto; } .input-container { display : flex; gap : 10px ; } #messageInput { flex : 1 ; padding : 10px ; border-radius : 4px ; border : 1px solid #ddd ; } button { padding : 10px 20px ; background-color : #4caf50 ; color : white; border : none; border-radius : 4px ; cursor : pointer; } </style > </head > <body > <h1 > 微光zc AI 助手</h1 > <div id ="chatContainer" class ="chat-container" > </div > <div class ="input-container" > <input type ="text" id ="messageInput" placeholder ="输入你的问题..." > <button id ="sendButton" > 发送</button > </div > <script > let sessionId = '' ; document .getElementById ('sendButton' ).addEventListener ('click' , sendMessage); document .getElementById ('messageInput' ).addEventListener ('keypress' , function (e ) { if (e.key === 'Enter' ) { sendMessage (); } }); function sendMessage ( const messageInput = document .getElementById ('messageInput' ); const message = messageInput.value .trim (); if (message) { appendMessage ('user' , message); messageInput.value = '' ; fetch ('/api/chat' , { method : 'POST' , headers : { 'Content-Type' : 'application/json' }, body : JSON .stringify ({ message : message, sessionId : sessionId }) }) .then (response =>json ()) .then (data => appendMessage ('assistant' , data.message ); if (data.sessionId ) { sessionId = data.sessionId ; } }) .catch (error => console .error ('Error:' , error); appendMessage ('assistant' , '抱歉,发生了错误,请稍后重试。' ); }); } } function appendMessage (role, content ) { const chatContainer = document .getElementById ('chatContainer' ); const messageDiv = document .createElement ('div' ); messageDiv.className = `message ${role} -message` ; messageDiv.textContent = content; chatContainer.appendChild (messageDiv); chatContainer.scrollTop = chatContainer.scrollHeight ; } </script > </body > </html >
启动应用并测试http:/localhost:8080 进行测试
提示词工程基础 使用PromptTemplate创建动态提示 基本用法
1 2 3 4 5 6 7 8 9 10 11 12 13 14 15 16 17 18 19 20 21 22 23 24 25 26 27 28 @Service public class ArticleGeneratorService { private final ChatClient chatClient; public ArticleGeneratorService (ChatClient chatClient) { this .chatClient = chatClient; } public String generateArticle (String topic, String targetAudience, int wordCount) { String templateString = """ 请以编程导航博主的身份,撰写一篇关于{topic}的技术文章。 目标读者:{audience} 文章风格:专业、清晰、易懂 字数要求:约{wordCount}字 文章结构应包含:引言、主要内容(2-3个核心部分)、总结 """ ; PromptTemplate template = new PromptTemplate (templateString); Map<String, Object> params = new HashMap <>(); params.put("topic" , topic); params.put("audience" , targetAudience); params.put("wordCount" , wordCount); String prompt = template.render(params); return chatClient.prompt().user(prompt).call().content(); } }
条件逻辑和高级模板
1 2 3 4 5 6 7 8 9 10 11 12 13 14 15 16 17 18 19 20 21 22 23 24 25 26 27 28 29 30 31 32 33 34 35 36 37 38 39 @Service public class CodeReviewService { private final ChatClient chatClient; public CodeReviewService (ChatClient chatClient) { this .chatClient = chatClient; } public String reviewCode (String code, String language, String level) { String templateString = """ 作为代码小抄的高级{language}开发专家,请对以下代码进行代码评审: ``` {language} {code} {# 根据不同级别调整评审深度 } {% if level == '初级' %} 请重点关注基本代码规范和常见错误。 {% elseif level == '中级' %} 请重点关注代码结构、性能优化和边界情况处理。 {% else %} 请进行全面深度评审,包括架构设计、性能优化、安全性、可扩展性和最佳实践。 {% endif %} /``` 请按以下格式提供评审结果: 1. 总体评价 2. 主要问题(按严重性排序) 3. 改进建议 4. 优化后的代码示例 """ ; PromptTemplate template = new PromptTemplate (templateString); Map<String, Object> params = new HashMap <>(); params.put("code" , code); params.put("language" , language); params.put("level" , level); String prompt = template.render(params); return chatClient.prompt().user(prompt).call().content(); } }
提示模板的复用和组合
1 2 3 4 5 6 7 8 9 10 11 12 13 14 15 16 17 18 19 20 21 22 23 24 25 26 27 28 29 30 @Configuration public class PromptTemplateConfig { @Bean public PromptTemplate codeExplanationTemplate () { return new PromptTemplate (""" 请解释以下{language}代码的功能: ```{language} {code} 解释应该面向{audience}级别的开发者。 """ ); } @Bean public PromptTemplate bugFixingTemplate () { return new Prom ptTemplate(""" 以下{language}代码存在问题: ```{language} {code} /``` 错误信息:{error} 请: 1. 分析问题根源 2. 提供修复后的完整代码 3. 解释修复的原理 """ ); } }
系统消息与用户消息的区别 在使用LLM时,消息类型对模型行为有很大的影响。
系统消息(SystemMessage)
1 2 3 4 5 SystemMessage systemMessage = new SystemMessa ge( "你是算法导航的专业算法讲师,擅长将复杂的算法概念解释得通俗易懂。" + "回答时应包含示例代码,并解释算法的时间和空间复杂度。" + "风格应保持专业但友好,适合计算机科学本科生理解。" );
用户消息(UserMessage)
1 2 3 UserMessage userMessage = new UserM essage( "请解释快速排序算法的工作原理,并给出 Java 实现。" );
正确组合使用
1 2 3 4 5 6 7 8 9 10 11 12 13 14 15 16 17 18 19 @Service public class AlgorithmTutorService { private final ChatClient chatClient; public AlgorithmTutorService (ChatClient chatClient) { this .chatClient = chatClient; } public String explainAlgorithm (String algorithm) { return chatClient.prompt() .system("你是算法导航的专业算法讲师,擅长将复杂的算法概念解释得通俗易懂。" + "回答时应包含示例代码,并解释算法的时间和空间复杂度。" + "风格应保持专业但友好,适合计算机科学本科生理解 " ) .user("请解释" + algorithm + "算法的工作原理,并给出 Java 实现。" ) .call() .content(); } }
上下文管理与对话历史 Al对话的质量很大程度上取决于上下文管理。
保持对话上下文
1 2 3 4 5 6 7 8 9 10 11 12 13 14 15 16 17 18 19 20 21 22 23 24 25 26 27 28 29 30 31 32 33 34 35 36 37 38 39 40 41 42 43 44 @Service public class ConversationService { private final ChatClient chatClient; private final Map<String, List<AbstractMessage>> conversationHistory = new HashMap <>(); public ConversationService (ChatClient chatClient) { this .chatClient = chatClient; } public String continueConversation (String userId, String newMessage) { List<AbstractMessage> history = conversationHistory.computeIfAbsent( userId, k -> new ArrayList <>(Arrays.asList( new SystemMessage ("你是面试鸭平台的面试教练,帮助用户准备技术面试。" ) )) ); UserMessage userMessage = new UserMessage (newMessage); history.add(userMessage); Prompt prompt = new Prompt (history); ChatResponse response = chatClient.call(prompt); String responseContent = response.getResult().getOutput().getContent(); history.add(new AssistantMessage (responseContent)); if (history.size() > 10 ) { List<AbstractMessage> trimmedHistory = new ArrayList <>(); trimmedHistory.add(history.get(0 )); trimmedHistory.addAll(history.subList(history.size() - 9 , history.size())); conversationHistory.put(userId, trimmedHistory); } return responseContent; } }
上下文窗口限制处理
1 2 3 4 5 6 7 8 9 10 11 12 13 14 15 16 17 18 19 20 21 22 23 24 25 26 27 28 29 30 31 32 33 34 35 36 37 38 39 40 41 42 43 44 45 46 47 48 49 50 51 52 53 54 55 56 57 58 59 60 61 62 @Service public class TokenAwareConversationService { private final ChatClient chatClient; private final Map<String, List<AbstractMessage>> conversationHistory = new HashMap <>(); private final int maxTokens = 4000 ; private int estimateTokenCount (String text) { return text.split("\\s+" ).length; } public String continueConversation (String userId, String newMessage) { List<AbstractMessage> history = conversationHistory.computeIfAbsent( userId, k -> new ArrayList <>(Arrays.asList( new SystemMessage ("你是编程导航的助教。" ) )) ); history.add(new UserMessage (newMessage)); int totalTokens = 0 ; List<AbstractMessage> effectiveHistory = new ArrayList <>(); effectiveHistory.add(history.get(0 )); totalTokens += estimateTokenCount(((SystemMessage)history.get(0 )).getContent()); for (int i = history.size() - 1 ; i > 0 ; i--) { AbstractMessage message = history.get(i); String content = "" ; if (message instanceof UserMessage) { content = ((UserMessage)message).getContent(); } else if (message instanceof AssistantMessage) { content = ((AssistantMessage)message).getContent(); } int messageTokens = estimateTokenCount(content); if (totalTokens + messageTokens < maxTokens) { effectiveHistory.add(0 , message); totalTokens += messageTokens; } else { break ; } } Prompt prompt = new Prompt (effectiveHistory); String responseContent = chatClient.call(prompt) .getResult().getOutput().getContent(); history.add(new AssistantMessage (responseContent)); return responseContent; } }
常见提示词技巧与模式 思维链提示(Chain of Thought)
1 2 3 4 5 6 7 8 9 10 11 12 13 String chainOfThoughtPrompt = """ 请分析以下算法问题并找出最优解: 给定一个整数数组,找出其中和最大的连续子数组。 请按照以下步骤思考: 1. 首先,分析问题的基本特点和边界条件 2. 考虑可能的解法(暴力法、分治法、动态规划等) 3. 比较不同方法的时间和空间复杂度 4. 确定最优解法 5. 用 Java 实现该算法 6. 分析算法的复杂度 7. 验证算法在示例用例上的正确性 """ ;
零样本、单样本和多样本提示
1 2 3 4 5 6 7 8 9 10 11 12 13 14 15 16 17 18 19 20 21 22 23 24 25 26 27 28 29 String zeroShotPrompt = "将以下句子从中文翻译成英文:'编程导航是一个帮助程序员学习的平台。'" ;String oneShotPrompt = """ 请根据示例,提供类似的转换: 输入:'Java 是一种广泛使用的编程语言。' 输出:'Java is a widely used programming language.' 现在,请转换:'编程导航是一个帮助程序员学习的平台。' """ ;String multiShotPrompt = """ 请根据以下示例,进行类似的转换: 示例 1: 输入:'Java 是一种广泛使用的编程语言。' 输出:'Java is a widely used programming language.' 示例 2: 输入:'面试鸭提供编程面试题和答案。' 输出:'Mianshiya provides programming interview questions and answers.' 示例 3: 输入:'老鱼简历帮助求职者制作专业简历。' 输出:'Laoyu Resume helps job seekers create professional resumes.' 现在,请转换:'编程导航是一个帮助程序员学习的平台。' """ ;
结果限制技巧
1 2 3 4 5 6 7 8 9 10 String constrainedPrompt = "" " 请提供 5 个提高 Java 编程技能的建议。 每个建议必须: 1. 不超过 20 字 2. 以动词开头 3. 可以立即执行 4. 具体明确 回答格式必须是带序号的简洁列表,不包含任何额外解释。 " "" ;
第三次实践 创建自定义角色的AI助手
定义系统提示模板
1 2 3 4 5 6 7 8 9 10 11 12 13 14 15 16 17 18 19 20 21 22 23 24 25 26 @Component public class AlgorithmCoachPrompts { public PromptTemplate getSystemPromptTemplate () { return new Prom ptTemplate(""" 你是算法导航的资深算法教练,名为"算法导航教练",专注于帮助{level}开发者提升算法能力。 你的特点: 1. 深入浅出:能将复杂算法概念解释得通俗易懂 2. 循序渐进:根据学习者水平调整难度 3. 鼓励思考:不直接给出完整答案,而是引导用户思考 4. 实用导向:强调算法在实际工作中的应用场景 回答风格: - 使用比喻和类比解释抽象概念 - 提供可视化描述帮助理解 - 代码示例使用 Java 语言,包含详细注释 - 友好专业,语气积极鼓励 你不是: - 不是搜索引擎,不提供与算法无关的信息 - 不是代码生成工具,不解决完整项目问题 - 不是竞赛教练,不过度关注算法竞赛技巧 """ ); } }
实现服务层
1 2 3 4 5 6 7 8 9 10 11 12 13 14 15 16 17 18 19 20 21 22 23 24 25 26 27 28 29 30 31 32 33 34 35 36 37 38 39 40 41 42 43 44 45 46 47 48 49 50 51 52 53 54 55 56 57 58 59 60 61 62 63 64 65 66 67 68 69 70 71 72 73 74 75 76 77 78 79 80 81 @Service public class AlgorithmCoachService { private final ChatClient chatClient; private final AlgorithmCoachPrompts prompts; private final Map<String, List<AbstractMessage>> sessionHistories = new ConcurrentHashMap <>(); public AlgorithmCoachService (ChatClient chatClient, AlgorithmCoachPrompts prompts) { this .chatClient = chatClient; this .prompts = prompts; } public String startSession (String userId, String level) { Map<String, Object> params = Map.of("level" , level); String systemPrompt = prompts.getSystemPromptTemplate().render(params); List<AbstractMessage> messages = new ArrayList <>(); messages.add(new SystemMessage (systemPrompt)); messages.add(new UserMessage ("你好,我想学习算法。" )); sessionHistories.put(userId, messages); Prompt prompt = new Prompt (messages); ChatResponse response = chatClient.call(prompt); String content = response.getResult().getOutput().getContent(); messages.add(new AssistantMessage (content)); return content; } public String continueConversation (String userId, String message) { List<AbstractMessage> history = sessionHistories.get(userId); if (history == null ) { return startSession(userId, "中级" ); } history.add(new UserMessage (message)); Prompt prompt = new Prompt (history); ChatResponse response = chatClient.call(prompt); String content = response.getResult().getOutput().getContent(); history.add(new AssistantMessage (content)); if (history.size() > 15 ) { List<AbstractMessage> trimmedHistory = new ArrayList <>(); trimmedHistory.add(history.get(0 )); trimmedHistory.addAll(history.subList(history.size() - 10 , history.size())); sessionHistories.put(userId, trimmedHistory); } return content; } public String getAlgorithmExplanation (String userId, String algorithm) { String message = "请解释" + algorithm + "算法的工作原理、时间复杂度和适用场景。" ; return continueConversation(userId, message); } public String getPracticeQuestion (String userId, String difficulty) { String message = "请给我一道" + difficulty + "难度的算法题,包含题目描述、示例输入输出和提示。" ; return continueConversation(userId, message); } public String evaluateSolution (String userId, String problem, String solution) { String message = "我的解法如下,请评估这个解法并给出改进建议:\n\n问题:" + problem + "\n\n我的解法:\n```java\n" + solution + "\n```" ; return continueConversation(userId, message); } }
新版本Prompt改了
1 2 3 4 5 6 7 8 9 10 11 12 13 14 15 16 17 18 19 20 21 22 23 24 25 26 27 28 29 30 31 32 33 34 35 36 37 38 39 40 41 42 43 44 45 46 47 48 49 50 51 52 53 54 55 56 57 58 59 60 61 62 63 64 65 66 67 68 69 70 71 72 73 74 75 76 77 78 79 80 81 82 83 84 85 86 87 88 89 90 91 92 93 94 95 96 package com.example.Spring_ai_6.service;import com.example.Spring_ai_6.model.AlgorithmCoachPrompts;import org.springframework.ai.chat.client.ChatClient;import org.springframework.ai.chat.messages.Message;import org.springframework.ai.chat.messages.AssistantMessage;import org.springframework.ai.chat.messages.SystemMessage;import org.springframework.ai.chat.messages.UserMessage;import org.springframework.stereotype.Service;import java.util.ArrayList;import java.util.List;import java.util.Map;import java.util.concurrent.ConcurrentHashMap;@Service public class AlgorithmCoachService { private final ChatClient chatClient; private final AlgorithmCoachPrompts prompts; private final Map<String, List<Message>> sessionHistories = new ConcurrentHashMap <>(); public AlgorithmCoachService (ChatClient chatClient, AlgorithmCoachPrompts prompts) { this .chatClient = chatClient; this .prompts = prompts; } public String startSession (String userId, String level) { Map<String, Object> params = Map.of("level" , level); String systemPrompt = prompts.getSystemPromptTemplate().render(params); List<Message> messages = new ArrayList <>(); messages.add(new SystemMessage (systemPrompt)); messages.add(new UserMessage ("你好,我想学习算法。" )); String content = chatClient.prompt() .messages(messages) .call() .content(); messages.add(new AssistantMessage (content)); sessionHistories.put(userId, messages); return content; } public String continueConversation (String userId, String message) { List<Message> history = sessionHistories.get(userId); if (history == null ) { return startSession(userId, "中级" ); } List<Message> currentMessages = new ArrayList <>(history); currentMessages.add(new UserMessage (message)); String content = chatClient.prompt() .messages(currentMessages) .call() .content(); List<Message> updatedHistory = new ArrayList <>(currentMessages); updatedHistory.add(new AssistantMessage (content)); if (updatedHistory.size() > 15 ) { List<Message> trimmed = new ArrayList <>(); trimmed.add(updatedHistory.get(0 )); trimmed.addAll(updatedHistory.subList(updatedHistory.size() - 10 , updatedHistory.size())); sessionHistories.put(userId, trimmed); } else { sessionHistories.put(userId, updatedHistory); } return content; } public String getAlgorithmExplanation (String userId, String algorithm) { String message = "请解释" + algorithm + "算法的工作原理、时间复杂度和适用场景。" ; return continueConversation(userId, message); } public String getPracticeQuestion (String userId, String difficulty) { String message = "请给我一道" + difficulty + "难度的算法题,包含题目描述、示例输入输出和提示。" ; return continueConversation(userId, message); } public String evaluateSolution (String userId, String problem, String solution) { String message = "我的解法如下,请评估这个解法并给出改进建议:\n\n问题:" + problem + "\n\n我的解法:\n```java\n" + solution + "\n```" ; return continueConversation(userId, message); } }
创建控制器
1 2 3 4 5 6 7 8 9 10 11 12 13 14 15 16 17 18 19 20 21 22 23 24 25 26 27 28 29 30 31 32 33 34 35 36 37 38 39 40 41 42 43 44 45 46 47 48 49 50 51 52 53 54 55 56 57 58 59 60 61 @RestController @RequestMapping("/api/algorithm-coach") public class AlgorithmCoachController { private final AlgorithmCoachService coachService; public AlgorithmCoachController (AlgorithmCoachService coachService) { this .coachService = coachService; } @PostMapping("/start") public ResponseEntity<Map<String, String>> startSession ( @RequestBody Map<String, String> request) { String userId = request.get("userId" ); String level = request.getOrDefault("level" , "中级" ); String response = coachService.startSession(userId, level); return ResponseEntity.ok(Map.of("response" , response)); } @PostMapping("/chat") public ResponseEntity<Map<String, String>> chat ( @RequestBody Map<String, String> request) { String userId = request.get("userId" ); String message = request.get("message" ); String response = coachService.continueConversation(userId, message); return ResponseEntity.ok(Map.of("response" , response)); } @PostMapping("/explain") public ResponseEntity<Map<String, String>> explainAlgorithm ( @RequestBody Map<String, String> request) { String userId = request.get("userId" ); String algorithm = request.get("algorithm" ); String response = coachService.getAlgorithmExplanation(userId, algorithm); return ResponseEntity.ok(Map.of("response" , response)); } @PostMapping("/practice") public ResponseEntity<Map<String, String>> getPracticeQuestion ( @RequestBody Map<String, String> request) { String userId = request.get("userId" ); String difficulty = request.getOrDefault("difficulty" , "中等" ); String response = coachService.getPracticeQuestion(userId, difficulty); return ResponseEntity.ok(Map.of("response" , response)); } @PostMapping("/evaluate") public ResponseEntity<Map<String, String>> evaluateSolution ( @RequestBody Map<String, String> request) { String userId = request.get("userId" ); String problem = request.get("problem" ); String solution = request.get("solution" ); String response = coachService.evaluateSolution(userId, problem, solution); return ResponseEntity.ok(Map.of("response" , response)); } }
结构化输出处理 在AI应用中,模型的输出可以大致分为两类:
非结构化响应(自然语言)
结构化响应(编程语言)
结构化输出的应用场景
数据提取和内容分类
1 2 3 4 5 6 7 8 9 10 11 12 13 14 15 16 17 18 19 20 21 22 23 24 25 26 public class ResumeParser { private final ChatClient chatClient; public ResumeParser (ChatClient chatClient) { this .chatClient = chatClient; } public ResumeData parseResume (String resumeText) { String prompt = "分析以下简历文本,提取关键信息:\n\n" + resumeText; return chatClient.call( prompt, new ResponseParser <>(ResumeData.class) ); } } public class ResumeData { private PersonalInfo personalInfo; private List<Education> education; private List<WorkExperience> workExperience; private List<String> skills; }
内容转换与格式化
1 2 3 4 5 6 7 8 9 10 11 12 13 14 15 16 17 18 19 20 21 22 23 24 25 26 public class ContentConverter { private final ChatClient chatClient; public ContentConverter (ChatClient chatClient) { this .chatClient = chatClient; } public List<SocialMediaPost> convertBlogToSocialMedia (String blogContent) { String prompt = "将以下博客文章转换为3种不同的社交媒体平台的帖子:\n\n" + blogContent; return chatClient.call( prompt, new ResponseParser <>(new TypeReference <List<SocialMediaPost>>() {}) ); } } public class SocialMediaPost { private String platform; private String content; private List<String> hashtags; private int estimatedReadTime; }
数据增强与丰富
1 2 3 4 5 6 7 8 9 10 11 12 13 14 15 16 17 18 19 20 21 22 23 24 25 26 27 28 29 public class SeoEnhancer { private final ChatClient chatClient; public SeoEnhancer (ChatClient chatClient) { this .chatClient = chatClient; } public SeoData enhanceProductDescription (Product product) { String prompt = String.format( "为以下产品生成 SEO 优化信息:\n名称:%s\n描述:%s\n类别:%s" , product.getName(), product.getDescription(), product.getCategory() ); return chatClient.call( prompt, new ResponseParser <>(SeoData.class) ); } } public class SeoData { private String title; private String metaDescription; private List<String> keywords; private Map<String, String> structuredData; }
智能表单填充
1 2 3 4 5 6 7 8 9 10 11 12 13 14 15 16 17 18 19 20 21 22 23 24 25 26 27 28 public class FormFiller { private final ChatClient chatClient; public FormFiller (ChatClient chatClient) { this .chatClient = chatClient; } public BugReport extractBugReport (String userDescription) { return chatClient .prompt() .user("从以下用户描述中提取bug报告所需的结构化信息:\n\n" + userDescription) .call() .entity(BugReport.class); } } public class BugReport { private String title; private String description; private String browser; private String operatingSystem; private String reproducibilitySteps; private String severity; private String priority; }
使用ChatClient获取结构化响应 Spring AI提供了简洁的方法来获取结构化JSON响应。以下是几种常用的方式:
明确指导AI生成JSON
1 2 3 4 5 6 7 8 9 10 11 12 13 14 15 16 17 18 19 20 21 22 23 24 public Product getProductWithFormatGuidance (String productType) { String prompt = String.format(""" 生成一个%s产品的详细信息,必须严格按照以下JSON格式返回: { "name": "产品名称", "price": 数字类型的价格, "description": "产品描述", "features": ["特点1", "特点2", "特点3"], "specifications": { "weight": "重量", "dimensions": "尺寸", "material": "材质" } } 不要添加任何额外的文本、解释或Markdown格式,只返回有效的JSON对象。 """ , productType); return chatClient.prompt() .user(prompt) .call() .entity(Product.class); }
使用系统消息引导输出格式
1 2 3 4 5 6 7 8 9 10 11 12 13 14 15 public Product getProductWithSystemMessage (String productType) { SystemMessage systemMessage = new SystemMessage ( "你是一个产品信息生成API。你只能返回有效的JSON格式数据,不能包含任何其他文本。" ); UserMessage userMessage = new UserMessage ( String.format("生成一个%s产品的详细信息" , productType) ); return chatClient.prompt() .system("你是一个产品信息生成API。你只能返回有效的JSON格式数据,不能包含任何其他文字。" ) .user(String.format("生成一个%s产品的详细信息" , productType)) .call() .entity(Product.class); }
Java对象映射技术 Spring AI利用Jackson库进行JSON和Java对象之间的映射。
1 2 3 4 5 6 7 8 9 10 11 12 13 14 15 16 17 18 19 20 21 22 23 public class Product { @JsonProperty("product_name") private String name; @JsonFormat(shape = JsonFormat.Shape.NUMBER_FLOAT, pattern = "#.##") private BigDecimal price; @JsonIgnore private String internalId; @JsonFormat(shape = JsonFormat.Shape.STRING, pattern = "yyyy-MM-dd") private LocalDate releaseDate; @JsonInclude(JsonInclude.Include.NON_NULL) private String optionalDescription; }
处理不匹配字段
1 2 3 4 5 6 7 8 9 10 11 12 13 14 15 16 @JsonIgnoreProperties(ignoreUnknown = true) public class ProductReview { private String reviewer; private int rating; private String comment; @JsonSetter(nulls = Nulls.SKIP) private List<String> pros = new ArrayList <>(); @JsonSetter(nulls = Nulls.SKIP) private List<String> cons = new ArrayList <>(); }
处理多态类型
1 2 3 4 5 6 7 8 9 10 11 12 13 14 15 16 17 18 19 20 21 22 23 24 25 26 27 28 29 30 31 32 33 34 35 36 37 @JsonTypeInfo( use = JsonTypeInfo.Id.NAME, include = JsonTypeInfo.As.PROPERTY, property = "type" ) @JsonSubTypes({ @JsonSubTypes.Type(value = PhysicalProduct.class, name = "physical"), @JsonSubTypes.Type(value = DigitalProduct.class, name = "digital"), @JsonSubTypes.Type(value = SubscriptionProduct.class, name = "subscription") }) public abstract class BaseProduct { private String id; private String name; private BigDecimal price; } public class PhysicalProduct extends BaseProduct { private String dimensions; private double weight; private String shippingMethod; } public class DigitalProduct extends BaseProduct { private String downloadUrl; private String fileFormat; private long fileSizeInBytes; } public class SubscriptionProduct extends BaseProduct { private String billingCycle; private boolean autoRenew; private int trialPeriodDays; }
使用@JsonClassDescription注解 可以为AI提供关于如何生成与Java类匹配的JSON结构的指导。
1 2 3 4 5 6 7 8 9 10 11 12 13 14 15 16 17 @JsonClassDescription("表示一个产品的详细信息,包含名称、价格、描述和分类") public class Product { @JsonPropertyDescription("产品的完整名称,应当简洁明了且具有描述性") private String name; @JsonPropertyDescription("产品价格,以元为单位的数值,不含货币符号") private BigDecimal price; @JsonPropertyDescription("产品的详细描述,突出产品的主要特点和优势") private String description; @JsonPropertyDescription("产品的主要分类,如'电子产品'、'家居用品'等") private String category; }
嵌套对象描述
1 2 3 4 5 6 7 8 9 10 11 12 13 14 15 16 17 18 19 20 21 22 23 24 25 26 27 28 29 @JsonClassDescription("电子商务系统中的完整产品信息") public class DetailedProduct { @JsonPropertyDescription("产品的基本信息") private ProductBasic basicInfo; @JsonPropertyDescription("产品的技术规格列表") private List<Specification> specifications; @JsonPropertyDescription("产品的价格信息,包括折扣") private PriceInfo priceInfo; } @JsonClassDescription("产品的基本信息") public class ProductBasic { } @JsonClassDescription("产品的技术规格") public class Specification { } @JsonClassDescription("产品的价格信息") public class PriceInfo { }
在提示中使用类描述
1 2 3 4 5 6 7 8 9 10 11 12 13 14 15 16 17 18 @Service public class ProductGenerationService { private final ChatClient chatClient; public ProductGenerationService (ChatClient chatClient) { this .chatClient = chatClient; } public DetailedProduct generateDetailedProduct (String productType) { String prompt = "为" + productType + "生成一个详细的产品信息。" ; return chatClient.prompt() .user(prompt) .call() .entity(DetailedProduct.class); } }
处理复杂的嵌套数据结构 实际应用中,我们可能需要处理具有多层嵌套的复杂数据结构。
1 2 3 4 5 6 7 8 9 10 11 12 13 14 15 16 17 18 19 20 21 22 23 24 25 26 27 28 29 30 31 32 33 34 35 @JsonClassDescription("代表一个电子商务网站的完整产品目录") public class ProductCatalog { @JsonPropertyDescription("目录的名称") private String name; @JsonPropertyDescription("目录的最后更新时间,格式为ISO-8601") private LocalDateTime lastUpdated; @JsonPropertyDescription("产品类别列表,按照类别组织产品") private List<ProductCategory> categories; } @JsonClassDescription("产品类别,包含该类别下的所有产品") public class ProductCategory { @JsonPropertyDescription("类别的唯一标识符") private String id; @JsonPropertyDescription("类别的显示名称") private String name; @JsonPropertyDescription("该类别的简短描述") private String description; @JsonPropertyDescription("该类别下的所有产品") private List<DetailedProduct> products; @JsonPropertyDescription("子类别列表") private List<ProductCategory> subCategories; }
处理动态属性
1 2 3 4 5 6 7 8 9 10 11 public class CustomProduct { private String name; private BigDecimal price; @JsonPropertyDescription("产品的自定义属性,键为属性名,值为属性值") private Map<String, Object> customAttributes; }
处理复杂的响应结构
1 2 3 4 5 6 7 8 9 10 11 12 13 14 15 16 17 18 19 20 21 22 23 24 25 26 27 28 29 30 31 32 33 34 35 36 37 38 39 40 @JsonTypeInfo(use = JsonTypeInfo.Id.NAME, property = "type") @JsonSubTypes({ @JsonSubTypes.Type(value = TextBlock.class, name = "text"), @JsonSubTypes.Type(value = ImageBlock.class, name = "image"), @JsonSubTypes.Type(value = TableBlock.class, name = "table"), @JsonSubTypes.Type(value = ListBlock.class, name = "list") }) public abstract class ContentBlock { private String id; private String type; private Map<String, Object> metadata; } public class TextBlock extends ContentBlock { private String text; private String formatting; } public class ImageBlock extends ContentBlock { private String url; private String altText; private Dimensions dimensions; } public class TableBlock extends ContentBlock { private List<List<String>> cells; private List<String> headers; } public class ListBlock extends ContentBlock { private List<String> items; private String listType; }
第四次实践 开发AI产品推荐系统
定义数据模型
1 2 3 4 5 6 7 8 9 10 11 12 13 14 15 16 17 18 19 20 21 22 23 24 25 26 27 28 29 30 31 32 33 34 35 36 37 38 39 40 41 42 43 44 45 46 47 48 49 50 51 52 53 54 55 56 57 58 59 60 61 62 63 64 65 66 67 68 69 70 71 72 @JsonClassDescription("用户信息") public class User { private String id; @JsonPropertyDescription("用户的完整姓名") private String name; @JsonPropertyDescription("用户的年龄") private int age; @JsonPropertyDescription("用户的性别,如'男'、'女'或'其他'") private String gender; @JsonPropertyDescription("用户的兴趣爱好列表") private List<String> interests; } @JsonClassDescription("产品推荐请求") public class RecommendationRequest { @JsonPropertyDescription("用户信息") private User user; @JsonPropertyDescription("要推荐的产品类别") private String category; @JsonPropertyDescription("推荐产品的数量") private int count; @JsonPropertyDescription("用户的历史购买记录") private List<String> purchaseHistory; } @JsonClassDescription("产品推荐结果") public class RecommendationResponse { @JsonPropertyDescription("推荐的产品列表") private List<RecommendedProduct> recommendations; @JsonPropertyDescription("推荐的依据或原因") private String reasonForRecommendations; } @JsonClassDescription("推荐的产品信息") public class RecommendedProduct { @JsonPropertyDescription("产品的唯一标识符") private String id; @JsonPropertyDescription("产品名称") private String name; @JsonPropertyDescription("产品描述") private String description; @JsonPropertyDescription("产品价格") private BigDecimal price; @JsonPropertyDescription("产品推荐理由") private String recommendationReason; @JsonPropertyDescription("与用户兴趣的匹配度,1-5分") private int matchScore; }
实现推荐服务
1 2 3 4 5 6 7 8 9 10 11 12 13 14 15 16 17 18 19 20 21 22 23 24 25 26 27 28 29 30 31 32 33 34 35 36 37 38 39 40 41 42 43 @Service public class ProductRecommendationService { private final ChatClient chatClient; public ProductRecommendationService (ChatClient chatClient) { this .chatClient = chatClient; } public RecommendationResponse getRecommendations (RecommendationRequest request) { SystemMessage systemMessage = new SystemMessage ( "你是代码小抄的产品推荐专家。根据用户信息和历史购买记录提供个性化产品推荐。" + "确保推荐理由合理且符合用户特征。返回的所有推荐都必须是JSON格式。" ); String userMessageContent = String.format( "请为以下用户推荐%d个%s类别的产品:\n" + "用户名: %s\n" + "年龄: %d\n" + "性别: %s\n" + "兴趣爱好: %s\n" + "历史购买: %s" , request.getCount(), request.getCategory(), request.getUser().getName(), request.getUser().getAge(), request.getUser().getGender(), String.join(", " , request.getUser().getInterests()), String.join(", " , request.getPurchaseHistory()) ); UserMessage userMessage = new UserMessage (userMessageContent); return chatClient.prompt() .system("你是代码小抄的产品推荐专家。根据用户信息和历史购买记录提供个性化产品推荐。" + "确保推荐理由合理且符合用户特征。返回的所有推荐都必须是JSON格式。" ) .user(userMessageContent) .call() .entity(RecommendationResponse.class); } }
创建控制器(REST控制器暴露API)
1 2 3 4 5 6 7 8 9 10 11 12 13 14 15 16 17 18 19 20 21 22 23 24 25 26 27 28 29 30 31 32 33 34 35 36 37 38 39 @RestController @RequestMapping("/api/recommendations") public class RecommendationController { private final ProductRecommendationService recommendationService; public RecommendationController (ProductRecommendationService recommendationService) { this .recommendationService = recommendationService; } @PostMapping public ResponseEntity<RecommendationResponse> getRecommendations (@RequestBody RecommendationRequest request) { try { RecommendationResponse response = recommendationService.getRecommendations(request); return ResponseEntity.ok(response); } catch (Exception e) { return ResponseEntity.status(HttpStatus.INTERNAL_SERVER_ERROR).build(); } } @GetMapping("/sample") public ResponseEntity<RecommendationRequest> getSampleRequest () { User user = new User (); user.setName("微光zc" ); user.setAge(22 ); user.setGender("男" ); user.setInterests(Arrays.asList("编程" , "技术博客" , "开源项目" , "算法" )); RecommendationRequest request = new RecommendationRequest (); request.setUser(user); request.setCategory("编程工具" ); request.setCount(3 ); request.setPurchaseHistory(Arrays.asList("Java编程指南" , "算法导论" , "设计模式" )); return ResponseEntity.ok(request); } }
测试系统
1 2 3 4 5 6 7 8 9 10 11 { "user" : { "name" : "微光zc" , "age" : 22 , "gender" : "男" , "interests" : ["编程" , "技术博客" , "开源项目" , "算法" ] }, "category" : "编程工具" , "count" : 3 , "purchaseHistory" : ["Java编程指南" , "算法导论" , "设计模式" ] }
使用python或postman发送请求
1 2 3 4 5 6 7 8 9 10 11 12 13 14 15 16 17 18 import requestsurl = "http://localhost:8080/api/recommendations" data = { "user" : { "name" : "微光zc" , "age" : 22 , "gender" : "男" , "interests" : ["编程" , "技术博客" , "开源项目" , "算法" ] }, "category" : "编程工具" , "count" : 3 , "purchaseHistory" : ["Java编程指南" , "算法导论" , "设计模式" ] } response = requests.post(url, json=data) print (response.status_code)print (response.json())
系统将返回类似以下的结构化响应:
1 2 3 4 5 6 7 8 9 10 11 12 13 14 15 16 17 18 19 20 21 22 23 24 25 26 27 28 29 { "recommendations" : [ { "id" : "tool-001" , "name" : "IntelliJ IDEA 旗舰版" , "description" : "强大的 Java 集成开发环境,提供智能代码补全、重构工具和深度静态分析。" , "price" : 1999.00 , "recommendationReason" : "作为一名关注编程和开源项目的程序员,高效的 IDE 能显著提升编码效率。历史购买显示对 Java 有浓厚兴趣。" , "matchScore" : 5 }, { "id" : "tool-002" , "name" : "算法导航 Pro 会员" , "description" : "一个专注于算法可视化和学习的平台,包含大量互动练习和竞赛题目。" , "price" : 299.00 , "recommendationReason" : "根据用户对算法的兴趣和购买历史中的《算法导论》,这个工具可以帮助用户深入理解和实践算法。" , "matchScore" : 5 }, { "id" : "tool-003" , "name" : "代码小抄 Premium" , "description" : "代码片段管理和分享工具,支持多种编程语言的语法高亮和版本控制。" , "price" : 199.00 , "recommendationReason" : "作为技术博主和开源项目爱好者,这个工具可以帮助整理和分享代码片段,提高工作效率。" , "matchScore" : 4 } ], "reasonForRecommendations" : "基于用户的编程背景、算法兴趣和Java学习方向,推荐了提升开发效率的IDE、深化算法学习的平台和代码管理工具。" }
向量数据库 嵌入(Embedding)的概念解析 嵌入(Embedding)是AI领域的核心概念(向量数据库的基础)
嵌入的工作原理
相似的概念拥有相似的向量表示
向量间的距离(如欧几里得距离、余弦距离)反映了原始数据的语义差异
向量可以用于数学运算,支持语义组合和比较
不同类型的嵌入
文本嵌入:将单词、句子或文档转换为向量(如Word2Vec、GloVe、BERT、GPT)。
图像嵌入:将图像转换为向量(如ResNet、VGG、CLIP)。
多模态嵌入:将不同类型的数据映射到同一向量空间。
常见向量数据库介绍
PostgreSQL + pgvector
Redis + RediSearch
Milvus(开源专用)
Pinecone
Elasticsearch + KNN
Spring AI中的向量存储抽象 Spring AI提供了一个统一的抽象层以一致的方式使用不同的向量数据库。
VectorStore接口
1 2 3 4 5 6 7 8 9 10 11 12 13 14 15 16 17 18 19 20 21 22 23 24 25 26 27 28 29 30 31 32 33 34 35 36 37 38 39 40 41 42 43 44 45 46 47 48 49 50 51 52 53 54 55 public interface VectorStore extends DocumentWriter { default String getName () { return this .getClass().getSimpleName(); } void add (List<Document> documents) ; default void accept (List<Document> documents) { this .add(documents); } void delete (List<String> idList) ; void delete (Filter.Expression filterExpression) ; default void delete (String filterExpression) { SearchRequest searchRequest = SearchRequest.builder().filterExpression(filterExpression).build(); Filter.Expression textExpression = searchRequest.getFilterExpression(); Assert.notNull(textExpression, "Filter expression must not be null" ); this .delete(textExpression); } @Nullable List<Document> similaritySearch (SearchRequest request) ; @Nullable default List<Document> similaritySearch (String query) { return this .similaritySearch(SearchRequest.builder().query(query).build()); } default <T> Optional<T> getNativeClient () { return Optional.empty(); } public interface Builder <T extends Builder <T>> { T observationRegistry (ObservationRegistry observationRegistry) ; T customObservationConvention (VectorStoreObservationConvention convention) ; T batchingStrategy (BatchingStrategy batchingStrategy) ; VectorStore build () ; } }
搜索请求构建
1 2 3 4 5 6 7 8 SearchRequest request = SearchRequest.builder() .query("什么是程序员鱼皮的编程导航学习网 codefather.cn?" ) .topK(5 ) .similarityThreshold(0.7 ) .filterExpression("category == 'web' AND date > '2025-05-03'" ) .build(); List<Document> results = vectorStore.similaritySearch(request);
SearchRequest提供了多种配置选项:
query:搜索的查询文本
topK:返回的最大结果数,默认为4
similarityThreshold:相似度阈值,低于此值的结果会被过滤掉
filterExpression:基于文档元数据的过滤表达式
Spring AI支持的向量存储实现
内存向量存储:适用于开发和测试,不需要外部依赖。
1 2 3 4 @Bean public VectorStore inMemoryVectorStore (EmbeddingModel embeddingModel) { return SimpleVectorStore.builder(embeddingModel).build(); }
Redis向量存储:使用Redis存储向量数据。
1 2 3 4 5 6 7 8 @Bean public VectorStore redisVectorStore ( EmbeddingModel embeddingModel, RedisConnectionFactory redisConnectionFactory) { return RedisVectorStore.builder(redisConnectionFactory, embeddingModel) .namespace("ai:embeddings" ) .build(); }
PostgreSQL向量存储:基于PostgreSQL和pgvector扩展。
1 2 3 4 5 6 @Bean public VectorStore pgVectorStore ( EmbeddingClient embeddingClient, DataSource dataSource) { return new PgVectorStore (embeddingClient, dataSource); }
配置Spring AI的向量存储
添加依赖:
1 2 3 4 5 6 7 8 9 10 11 12 13 14 <dependency > <groupId > org.springframework.ai</groupId > <artifactId > spring-ai-pgvector-store</artifactId > <version > ${spring-ai.version}</version > </dependency > <dependency > <groupId > org.postgresql</groupId > <artifactId > postgresql</artifactId > <version > ${postgresql.version}</version > </dependency >
数据库配置:
1 2 3 4 5 6 7 8 spring.datasource.url=jdbc:postgresql://localhost:5432/vectordb spring.datasource.username=postgres spring.datasource.password=password spring.datasource.driver-class-name=org.postgresql.Driver spring.ai.vectorstore.pgvector.table-name=document_embeddings
初始化pgvector:
1 2 3 4 5 6 7 8 9 10 11 12 13 14 CREATE EXTENSION IF NOT EXISTS vector;CREATE TABLE IF NOT EXISTS document_embeddings ( id text PRIMARY KEY , content text, metadata jsonb, embedding vector(1536 ) ); CREATE INDEX IF NOT EXISTS document_embeddings_embedding_idx ON document_embeddingsUSING hnsw (embedding vector_cosine_ops);
基础向量搜索实现 使用Spring AI的向量存储来实现基础的向量搜索功能。
文档索引服务
1 2 3 4 5 6 7 8 9 10 11 12 13 14 15 16 17 18 19 20 21 22 23 24 25 26 27 @Service public class DocumentIndexService { private final VectorStore vectorStore; private final EmbeddingClient embeddingClient; public DocumentIndexService (VectorStore vectorStore, EmbeddingClient embeddingClient) { this .vectorStore = vectorStore; this .embeddingClient = embeddingClient; } public void indexDocument (String id, String content, Map<String, Object> metadata) { Embedding embedding = embeddingClient.embed(content); vectorStore.add(id, embedding, metadata); } public void batchIndexDocuments (List<Document> documents) { vectorStore.add(documents); } public void deleteDocument (String id) { vectorStore.delete(Collections.singletonList(id)); } }
文档搜索服务
1 2 3 4 5 6 7 8 9 10 11 12 13 14 15 16 17 18 @Service public class DocumentSearchService { private final VectorStore vectorStore; public DocumentSearchService (VectorStore vectorStore) { this .vectorStore = vectorStore; } public List<Document> searchSimilarDocuments (String query, int maxResults) { return vectorStore.similaritySearch(query, maxResults); } public List<Document> searchWithFilter (String query, int maxResults, String category) { List<String> filter = Collections.singletonList("metadata.category == '" + category + "'" ); return vectorStore.similaritySearch(query, maxResults, filter); } }
文档处理工具类
1 2 3 4 5 6 7 8 9 10 11 12 13 14 15 16 17 18 19 20 21 22 23 24 25 26 27 28 29 30 31 32 @Component public class DocumentProcessor { public List<Document> splitTextIntoDocuments (String text, String metadata) { List<Document> documents = new ArrayList <>(); String[] paragraphs = text.split("\n\n" ); for (int i = 0 ; i < paragraphs.length; i++) { if (paragraphs[i].trim().length() > 10 ) { Map<String, Object> meta = new HashMap <>(); meta.put("index" , i); meta.put("source" , metadata); documents.add(new Document ( UUID.randomUUID().toString(), paragraphs[i], meta )); } } return documents; } public List<Document> createDocumentsFromFile (File file) throws IOException { String content = new String (Files.readAllBytes(file.toPath())); return splitTextIntoDocuments(content, file.getName()); } }
相似度计算与匹配原理 向量搜索的核心是相似度计算,决定如何度量两个向量之间的”距离”或”相似程度“。
余弦相似度(Cosine Similarity):
1 2 3 4 5 6 7 8 9 10 11 12 13 public double cosineSimilarity (List<Double> v1, List<Double> v2) { double dotProduct = 0.0 ; double norm1 = 0.0 ; double norm2 = 0.0 ; for (int i = 0 ; i < v1.size(); i++) { dotProduct += v1.get(i) * v2.get(i); norm1 += Math.pow(v1.get(i), 2 ); norm2 += Math.pow(v2.get(i), 2 ); } return dotProduct / (Math.sqrt(norm1) * Math.sqrt(norm2)); }
欧几里得距离(Euclidean Distance):
1 2 3 4 5 6 7 8 9 10 public double euclideanDistance (List<Double> v1, List<Double> v2) { double sum = 0.0 ; for (int i = 0 ; i < v1.size(); i++) { double diff = v1.get(i) - v2.get(i); sum += diff * diff; } return Math.sqrt(sum); }
点积(Dot Product):
1 2 3 4 5 6 7 8 9 public double dotProduct (List<Double> v1, List<Double> v2) { double result = 0.0 ; for (int i = 0 ; i < v1.size(); i++) { result += v1.get(i) * v2.get(i); } return result; }
近似最近邻算法
HNSW (Hierarchical Navigable Small World):
IVF (Inverted File Index):
IVFPQ (IVF Product Quantization):
检索增强生成(RAG)入门 RAG的基本概念 检索增强生成(Retrieval–Augmented Generation,RAG)是一种混合AI架构
将知识库文档转换为向量表示并存储
当收到用户查询时,检索最相关的文档片段
将检索到的文档作为上下文,连同用户查询一起发送给AI模型
AI模型基于检索到的信息生成回答
文档处理与ETL管道 实现RAG第一步需要处理和准备文档,将其转换为适合检索的格式。
提取(Extract):从各种来源加载文档
转换(Transform):清理、分块和向量化文档
加载(Load):将向量化的文档存入向量数据库
DocumentReader:文档提取
JsonReader:解析JSON数据
TextReader:读取纯文本文件
MarkdownReader:读取Markdown文件
PDFReader:读取PDF文件
HtmlReader:解析HTML内容
TikaDocumentReader:使用Apache Tika读取多种格式
1 2 3 4 5 6 7 public List<Document> loadDocuments (String directoryPath) { TextReader reader = new TextReader (); reader.setRecursive(true ); Resource resource = new FileSystemResource (directoryPath); return reader.get(resource); }
DocumentTransformer:文档转换
文本分块器(TextSplitter)
1 2 3 4 5 6 7 8 TextSplitter splitter = new TokenTextSplitter ();splitter.setChunkSize(512 ); splitter.setChunkOverlap(50 ); List<Document> documents = loadDocuments("./data" ); List<Document> splitDocuments = splitter.apply(documents);
元数据增强器(MetadataEnricher)
1 2 3 4 5 6 7 8 9 10 11 KeywordMetadataEnricher keywordEnricher = new KeywordMetadataEnricher ();keywordEnricher.setMetadataKey("keywords" ); SummaryMetadataEnricher summaryEnricher = new SummaryMetadataEnricher (chatClient);summaryEnricher.setMetadataKey("summary" ); List<Document> enrichedDocuments = keywordEnricher.apply(splitDocuments); enrichedDocuments = summaryEnricher.apply(enrichedDocuments);
内容格式化器(ContentFormatter)
1 2 3 4 ContentFormatter formatter = new ContentFormatter ();formatter.setFormatType(ContentFormatter.FormatType.MARKDOWN); List<Document> formattedDocuments = formatter.apply(enrichedDocuments);
DocumentWriter:文档存储
1 2 3 4 5 6 7 FileDocumentWriter fileWriter = new FileDocumentWriter ("./processed-documents" );fileWriter.accept(formattedDocuments); VectorStoreWriter vectorStoreWriter = new VectorStoreWriter (vectorStore);vectorStoreWriter.accept(formattedDocuments);
向量存储与检索 VectorStore接口
1 2 3 4 5 6 7 8 9 10 11 12 13 14 15 16 17 18 19 20 21 22 23 24 25 26 27 28 29 30 31 32 33 34 35 36 37 38 39 40 41 42 public interface VectorStore extends DocumentWriter { default String getName () { return this .getClass().getSimpleName(); } void add (List<Document> documents) ; default void accept (List<Document> documents) { this .add(documents); } void delete (List<String> idList) ; void delete (Filter.Expression filterExpression) ; default void delete (String filterExpression) { SearchRequest searchRequest = SearchRequest.builder().filterExpression(filterExpression).build(); Filter.Expression textExpression = searchRequest.getFilterExpression(); Assert.notNull(textExpression, "Filter expression must not be null" ); this .delete(textExpression); } @Nullable List<Document> similaritySearch (SearchRequest request) ; @Nullable default List<Document> similaritySearch (String query) { return this .similaritySearch(SearchRequest.builder().query(query).build()); } default <T> Optional<T> getNativeClient () { return Optional.empty(); } public interface Builder <T extends Builder <T>> { T observationRegistry (ObservationRegistry observationRegistry) ; T customObservationConvention (VectorStoreObservationConvention convention) ; T batchingStrategy (BatchingStrategy batchingStrategy) ; VectorStore build () ; } }
SearchRequest
1 2 3 4 5 6 7 8 SearchRequest request = SearchRequest.builder() .query("Spring框架如何处理依赖注入?" ) .topK(5 ) .similarityThreshold(0.7f ) .filterExpression("metadata.category == '技术文档'" ) .build(); List<Document> results = vectorStore.similaritySearch(request);
支持的向量数据库
内存向量库:用于测试和小型应用
1 2 3 4 5 EmbeddingModel embeddingModel = new OpenAiEmbeddingModel ("text-embedding-3-small" );InMemoryVectorStore vectorStore = InMemoryVectorStore.builder() .embeddingModel(embeddingModel) .build();
Redis向量库:利用Redis的高性能特性
1 2 3 4 5 6 RedisVectorStore vectorStore = RedisVectorStore.builder() .embeddingModel(embeddingModel) .redisTemplate(redisTemplate) .indexName("document-index" ) .build();
PostgreSQL向量库:使用PGVector扩展
1 2 3 4 5 PgVectorStore vectorStore = PgVectorStore.builder() .embeddingModel(embeddingModel) .jdbcTemplate(jdbcTemplate) .build();
其他支持的向量数据库:Milvus、Elasticsearch、Chroma、Pinecone、Weaviate等。
实现RAG系统 查询处理与优化
查询转换器(QueryTransformer)
1 2 3 4 5 6 7 8 9 10 11 RewriteQueryTransformer rewriteTransformer = new RewriteQueryTransformer (chatClient);String enhancedQuery = rewriteTransformer.transform("怎么学Java?" );TranslationQueryTransformer translationTransformer = new TranslationQueryTransformer (chatClient, Locale.ENGLISH);String translatedQuery = translationTransformer.transform("如何实现单例模式?" );CompressionQueryTransformer compressionTransformer = new CompressionQueryTransformer (chatClient);String compressedQuery = compressionTransformer.transform("请详细解释Spring框架中的依赖注入机制..." );
查询扩展器(QueryExpander)
1 2 MultiQueryExpander multiQueryExpander = new MultiQueryExpander (chatClient);List<String> queryVariants = multiQueryExpander.expand("如何优化MySQL查询?" );
文档检索
DocumentRetriever接口
1 2 3 public interface DocumentRetriever { List<Document> retrieve (String query) ; }
主要实现是VectorStoreDocumentRetriever
1 2 3 4 5 6 7 VectorStoreDocumentRetriever retriever = VectorStoreDocumentRetriever.builder() .vectorStore(vectorStore) .k(5 ) .build(); List<Document> documents = retriever.retrieve("Spring Boot自动配置原理" );
DocumentJoiner
1 2 ConcatenationDocumentJoiner joiner = new ConcatenationDocumentJoiner ();Document combinedDocument = joiner.join(documents);
RAG Advisors Spring AI提供了高级的RAG Advisor组件,简化RAG系统实现:
QuestionAnswerAdvisor
1 2 3 4 5 6 7 8 9 10 11 12 QuestionAnswerAdvisor advisor = QuestionAnswerAdvisor.builder() .chatClient(chatClient) .retriever(retriever) .build(); QaResponse response = advisor.answer("Spring Boot的核心特性有哪些?" );System.out.println("回答: " + response.getText()); List<RetrievalResult> retrievalResults = response.getRetrievalResults();
RetrievalAugmentationAdvisor
1 2 3 4 5 6 7 8 9 10 11 RetrievalAugmentationAdvisor ragAdvisor = RetrievalAugmentationAdvisor.builder() .chatClient(chatClient) .queryTransformer(rewriteTransformer) .retriever(retriever) .build(); String answer = ragAdvisor.retrieve("什么是微服务架构?" ) .thenApply(ragAdvisor::generateAnswer) .getText();
ContextualQueryAugmenter
1 2 3 4 5 6 7 ContextualQueryAugmenter augmenter = ContextualQueryAugmenter.builder() .emptyContextPromptTemplate("找不到相关信息,请告诉用户:{query}" ) .contextPromptTemplate("基于以下信息回答问题:\n\n{context}\n\n问题:{query}" ) .build(); String prompt = augmenter.augment("Spring WebFlux是什么?" , retrievalResults);
工具调用功能 工具定义模式 Spring Al提供了两种定义工具的模式:
基于Methods方法(推荐)
基于Functions函数式编程
定义工具的方式
注解式:只需在普通Java方法上添加@Tool注解即可定义工具,简单又直观。
1 2 3 4 5 6 7 class WeatherTools { @Tool(description = "获取指定城市的当前天气情况") String getWeather (@ToolParam(description = "城市名称") String city) { return "北京今天晴朗,气温25°C" ; } }
编程式:如果需要在运行时动态创建工具,可以选择更灵活的编程式方法。
1 2 3 4 5 6 class WeatherTools { String getWeather (String city) { return "北京今天晴朗,气温25°C" ; } }
然后将其转换为ToolCallback工具定义:
1 2 3 4 5 6 7 8 Method method = ReflectionUtils.findMethod(WeatherTools.class, "getWeather" , String.class);ToolCallback toolCallback = MethodToolCallback.builder() .toolDefinition(ToolDefinition.builder(method) .description("获取指定城市的当前天气情况" ) .build()) .toolMethod(method) .toolObject(new WeatherTools ()) .build();
在定义工具时,需要注意选择合适的参数和返回值类型。
Optional类型
异步类型(如CompletableFuture,Future)
响应式类型(如Flow,Mono,Flux)
函数式类型(如Function,Supplier,Consumer)
使用工具 定义好工具后,Spring AI提供了多种灵活方式将工具提供给ChatClient,让AI能在适当时机调用这些工具。
按需使用:这是最简洁的方式,直接在构建ChatClient请求时通过tools()方法附加所需工具。
1 2 3 4 5 String response = ChatClient.create(chatModel) .prompt("北京今天天气怎么样?" ) .tools(new WeatherTools ()) .call() .content();
全局使用:如果某些工具需要在所有对话中都可用,可以在构建ChatClient时注册为默认工具。
1 2 3 ChatClient chatClient = ChatClient.builder(chatModel) .defaultTools(new WeatherTools (), new TimeTools ()) .build();
更底层的使用方式:除了给ChatClient绑定工具,还可以直接为底层ChatModel绑定工具。
1 2 3 4 5 6 7 8 9 ToolCallback[] weatherTools = ToolCallbacks.from(new WeatherTools ()); ChatOptions chatOptions = ToolCallingChatOptions.builder() .toolCallbacks(weatherTools) .build(); Prompt prompt = new Prompt ("北京今天天气怎么样?" , chatOptions);chatModel.call(prompt);
在使用工具时,Spring AI为我们自动处理了整个工具调用流程:
@Tool注解是Spring AI工具调用功能的核心,可用于标记那些可以被Al模型调用的方法。
description:详细说明工具的功能和用途,帮助AI准确判断何时应该使用该工具
name:工具的唯一标识符(可选参数,默认会使用方法名)
首先,在项目根包下创建too1s包,用于集中管理所有工具类;
文件操作工具
1 2 3 4 5 6 public interface FileConstant { String FILE_SAVE_DIR = System.getProperty("user.dir" ) + "/tmp" ; }
然后编写文件操作工具类:
1 2 3 4 5 6 7 8 9 10 11 12 13 14 15 16 17 18 19 20 21 22 23 24 25 26 27 28 29 public class FileOperationTool { private final String FILE_DIR = FileConstant.FILE_SAVE_DIR + "/file" ; @Tool(description = "读取指定文件的内容") public String readFile (@ToolParam(description = "要读取的文件名称") String fileName) { String filePath = FILE_DIR + "/" + fileName; try { return FileUtil.readUtf8String(filePath); } catch (Exception e) { return "读取文件出错: " + e.getMessage(); } } @Tool(description = "将内容写入到指定文件") public String writeFile ( @ToolParam(description = "要写入的文件名称") String fileName, @ToolParam(description = "要写入的文件内容") String content) { String filePath = FILE_DIR + "/" + fileName; try { FileUtil.mkdir(FILE_DIR); FileUtil.writeUtf8String(content, filePath); return "文件成功写入至: " + filePath; } catch (Exception e) { return "写入文件出错: " + e.getMessage(); } } }
联网搜索工具
1 2 3 4 5 6 7 8 9 10 11 12 13 14 15 16 17 18 19 20 21 22 23 24 25 26 27 28 29 30 31 32 33 34 35 36 public class WebSearchTool { private static final String SEARCH_API_URL = "https://www.searchapi.io/api/v1/search" ; private final String apiKey; public WebSearchTool (String apiKey) { this .apiKey = apiKey; } @Tool(description = "从百度搜索引擎搜索信息") public String searchWeb ( @ToolParam(description = "搜索关键词") String query) { Map<String, Object> paramMap = new HashMap <>(); paramMap.put("q" , query); paramMap.put("api_key" , apiKey); paramMap.put("engine" , "baidu" ); try { String response = HttpUtil.get(SEARCH_API_URL, paramMap); JSONObject jsonObject = JSONUtil.parseObj(response); JSONArray organicResults = jsonObject.getJSONArray("organic_results" ); List<Object> objects = organicResults.subList(0 , 5 ); String result = objects.stream().map(obj -> { JSONObject tmpJSONObject = (JSONObject) obj; return tmpJSONObject.toString(); }).collect(Collectors.joining("," )); return result; } catch (Exception e) { return "搜索出错: " + e.getMessage(); } } }
网页抓取工具
1 2 3 4 5 6 7 8 9 10 11 12 public class WebScrapingTool { @Tool(description = "从指定URL抓取网页内容") public String scrapeWebPage (@ToolParam(description = "要抓取的网页URL") String url) { try { Document doc = Jsoup.connect(url).get(); return doc.html(); } catch (IOException e) { return "抓取网页出错: " + e.getMessage(); } } }
终端操作工具
1 2 3 4 5 6 7 8 9 10 11 12 13 14 15 16 17 18 19 20 21 22 23 24 public class TerminalOperationTool { @Tool(description = "在终端执行命令") public String executeTerminalCommand (@ToolParam(description = "要执行的命令") String command) { StringBuilder output = new StringBuilder (); try { ProcessBuilder builder = new ProcessBuilder ("cmd.exe" , "/c" , command); Process process = builder.start(); try (BufferedReader reader = new BufferedReader (new InputStreamReader (process.getInputStream()))) { String line; while ((line = reader.readLine()) != null ) { output.append(line).append("\n" ); } } int exitCode = process.waitFor(); if (exitCode != 0 ) { output.append("命令执行失败,退出码: " ).append(exitCode); } } catch (IOException | InterruptedException e) { output.append("执行命令出错: " ).append(e.getMessage()); } return output.toString(); } }
资源下载工具
1 2 3 4 5 6 7 8 9 10 11 12 13 14 15 16 17 public class ResourceDownloadTool { @Tool(description = "从指定URL下载资源到本地") public String downloadResource (@ToolParam(description = "要下载的资源URL") String url, @ToolParam(description = "保存到本地的文件名") String fileName) { String fileDir = FileConstant.FILE_SAVE_DIR + "/download" ; String filePath = fileDir + "/" + fileName; try { FileUtil.mkdir(fileDir); HttpUtil.downloadFile(url, new File (filePath)); return "资源成功下载至: " + filePath; } catch (Exception e) { return "下载资源出错: " + e.getMessage(); } } }
PDF生成工具
1 2 3 4 5 6 7 8 9 10 11 12 13 14 15 16 17 18 19 20 21 22 23 24 25 26 27 28 29 public class PDFGenerationTool { @Tool(description = "根据内容生成PDF文件") public String generatePDF ( @ToolParam(description = "要保存的PDF文件名") String fileName, @ToolParam(description = "PDF文件的内容") String content) { String fileDir = FileConstant.FILE_SAVE_DIR + "/pdf" ; String filePath = fileDir + "/" + fileName; try { FileUtil.mkdir(fileDir); try (PdfWriter writer = new PdfWriter (filePath); PdfDocument pdf = new PdfDocument (writer); Document document = new Document (pdf)) { PdfFont font = PdfFontFactory.createFont("STSongStd-Light" , "UniGB-UCS2-H" ); document.setFont(font); Paragraph paragraph = new Paragraph (content); document.add(paragraph); } return "PDF文件成功生成至: " + filePath; } catch (IOException e) { return "生成PDF出错: " + e.getMessage(); } } }
集中注册工具
1 2 3 4 5 6 7 8 9 10 11 12 13 14 15 16 17 18 19 20 21 22 23 24 @Configuration public class ToolRegistration { @Value("${search-api.api-key}") private String searchApiKey; @Bean public ToolCallback[] allTools() { FileOperationTool fileOperationTool = new FileOperationTool (); WebSearchTool webSearchTool = new WebSearchTool (searchApiKey); WebScrapingTool webScrapingTool = new WebScrapingTool (); ResourceDownloadTool resourceDownloadTool = new ResourceDownloadTool (); TerminalOperationTool terminalOperationTool = new TerminalOperationTool (); PDFGenerationTool pdfGenerationTool = new PDFGenerationTool (); return ToolCallbacks.from( fileOperationTool, webSearchTool, webScrapingTool, resourceDownloadTool, terminalOperationTool, pdfGenerationTool ); } }
MCP 协议 MCP(Model Context Protocol,模型上下文协议)
轻松增强AI的能力:通过接入MCP服务,AI可以搜索网页、查询数据库、调用第三方API、执行计算等
统一标准,降低使用成本:开发者不必为每个项目重复开发相同功能
打造服务生态:形成MCP服务市场,让开发者能共享和使用彼此的服务
客户端/服务器层:处理各自的协议操作
会话层:管理通信模式和状态
传输层:处理消息序列化和传输
MCP支持多种核心概念,其中最实用的是Tools(工具),让服务端可以向客户端提供可调用的函数,使AI模型能执行计算、查询信息或与外部系统交互。
云平台使用 MCP提示:我的另一半居住在上海静安区,请帮我找到 5 公里内合适的约会地点。
软件客户端使用MCP
安装必要工具,如Node.js和NPX(大多数MCP服务都支持NPX运行)
申请所需的API Key(如高德地图API Key)
在Cursor设置中添加MCP Server,并粘贴配置
测试使用,同样可以询问附近约会地点
1 2 3 4 5 6 7 8 9 { "name" : "amap-maps" , "command" : "npx" , "args" : [ "-y" , "@amap/amap-maps-mcp-server" ] , "env" : { "AMAP_MAPS_API_KEY" : "你的API密钥" } }
程序中使用MCP
引入依赖:
1 2 3 4 5 <dependency > <groupId > org.springframework.ai</groupId > <artifactId > spring-ai-mcp-client-spring-boot-starter</artifactId > <version > 1.0.0</version > </dependency >
配置MCP服务:
1 2 3 4 5 6 7 8 9 10 11 12 { "mcpServers" : { "amap-maps" : { "command" : "npx" , "args" : [ "-y" , "@amap/amap-maps-mcp-server" ] , "env" : { "AMAP_MAPS_API_KEY" : "你的API密钥" } } } }
修改Spring配置:
1 2 3 4 5 6 spring: ai: mcp: client: stdio: servers-configuration: classpath:mcp-servers.json
编写代码使用MCP:
1 2 3 4 5 6 7 8 9 10 11 12 13 14 15 16 17 @Resource private ToolCallbackProvider toolCallbackProvider;public String doChatWithMcp (String message, String chatId) { ChatResponse response = chatClient .prompt() .user(message) .advisors(spec -> spec.param(CHAT_MEMORY_CONVERSATION_ID_KEY, chatId) .param(CHAT_MEMORY_RETRIEVE_SIZE_KEY, 10 )) .advisors(new MyLoggerAdvisor ()) .tools(toolCallbackProvider) .call() .chatResponse(); String content = response.getResult().getOutput().getText(); log.info("content: {}" , content); return content; }
Spring AI MCP开发模式
引入依赖:
1 2 3 4 5 <dependency > <groupId > org.springframework.ai</groupId > <artifactId > spring-ai-mcp-client-spring-boot-starter</artifactId > <version > 1.0.0</version > </dependency >
配置连接:支持直接在配置文件中设置或引用JSON文件
1 2 3 4 5 6 7 8 9 10 11 12 13 14 15 16 17 18 19 20 21 22 spring: ai: mcp: client: enabled: true name: 编程导航-mcp-client version: 1.0 .0 request-timeout: 30s type: SYNC sse: connections: server1: url: http://localhost:8080 spring: ai: mcp: client: stdio: servers-configuration: classpath:mcp-servers.json
使用服务:通过自动注入的Bean来使用MCP服务
1 2 3 4 5 6 7 8 9 10 11 12 13 14 15 @Autowired private List<McpSyncClient> mcpSyncClients;@Autowired private SyncMcpToolCallbackProvider toolCallbackProvider;ChatResponse response = chatClient .prompt() .user("请查询上海静安区附近的餐厅" ) .tools(toolCallbackProvider) .call() .chatResponse();
MCP服务端开发
引入依赖:
1 2 3 4 5 <dependency > <groupId > org.springframework.ai</groupId > <artifactId > spring-ai-starter-mcp-server</artifactId > <version > 1.0.0</version > </dependency >
配置服务
1 2 3 4 5 6 7 8 spring: ai: mcp: server: name: 编程导航-mcp-server version: 1.0 .0 stdio: true type: SYNC
开发服务:使用@Too1注解标记服务类中的方法
1 2 3 4 5 6 7 8 9 @Service public class WeatherService { @Tool(description = "获取指定城市的天气信息") public String getWeather ( @ToolParam(description = "城市名称,如北京、上海") String cityName) { return "城市" + cityName + "的天气是晴天,温度22°C" ; } }
注册工具
1 2 3 4 5 6 7 8 9 @SpringBootApplication public class McpServerApplication { @Bean public ToolCallbackProvider weatherTools (WeatherService weatherService) { return MethodToolCallbackProvider.builder() .toolObjects(weatherService) .build(); } }
第五次实践 MCP开发实战:图片搜索服务
创建项目并引入依赖:
1 2 3 4 5 <dependency > <groupId > org.springframework.ai</groupId > <artifactId > spring-ai-starter-mcp-server-webmvc</artifactId > <version > 1.0.0</version > </dependency >
配置
1 2 3 4 5 6 7 8 9 10 11 12 13 14 spring: application: name: yu-image-search-mcp-server profiles: active: stdio ai: mcp: server: name: yu-image-search-mcp-server version: 0.0 .1 type: SYNC stdio: true server: port: 8127
开发图片搜索工具:
1 2 3 4 5 6 7 8 9 10 11 12 13 14 15 16 17 18 19 20 21 22 23 24 25 26 27 28 29 30 31 32 33 34 35 36 37 38 39 40 41 42 @Service public class ImageSearchTool { private static final String API_KEY = "你的Pexels API密钥" ; private static final String API_URL = "https://api.pexels.com/v1/search" ; @Tool(description = "search image from web") public String searchImage (@ToolParam(description = "Search query keyword") String query) { try { return String.join("," , searchMediumImages(query)); } catch (Exception e) { return "Error search image: " + e.getMessage(); } } public List<String> searchMediumImages (String query) { Map<String, String> headers = new HashMap <>(); headers.put("Authorization" , API_KEY); Map<String, Object> params = new HashMap <>(); params.put("query" , query); String response = HttpUtil.createGet(API_URL) .addHeaders(headers) .form(params) .execute() .body(); return JSONUtil.parseObj(response) .getJSONArray("photos" ) .stream() .map(photoObj -> (JSONObject) photoObj) .map(photoObj -> photoObj.getJSONObject("src" )) .map(photo -> photo.getStr("medium" )) .filter(StrUtil::isNotBlank) .collect(Collectors.toList()); } }
在主类中注册工具:
1 2 3 4 5 6 7 8 9 10 11 12 13 14 @SpringBootApplication public class YuImageSearchMcpServerApplication { public static void main (String[] args) { SpringApplication.run(YuImageSearchMcpServerApplication.class, args); } @Bean public ToolCallbackProvider imageSearchTools (ImageSearchTool imageSearchTool) { return MethodToolCallbackProvider.builder() .toolObjects(imageSearchTool) .build(); } }
客户端调用
配置客户端:
1 2 3 4 5 6 7 8 9 10 11 12 13 14 15 16 { "mcpServers" : { "yu-image-search-mcp-server" : { "command" : "java" , "args" : [ "-Dspring.ai.mcp.server.stdio=true" , "-Dspring.main.web-application-type=none" , "-Dlogging.pattern.console=" , "-jar" , "yu-image-search-mcp-server/target/yu-image-search-mcp-server-0.0.1-SNAPSHOT.jar" ] , "env" : { } } } }
测试
1 2 3 4 5 6 7 @Test void doChatWithMcp () { String message = "帮我搜索一些编程导航相关的图片" ; String answer = loveApp.doChatWithMcp(message, chatId); Assertions.assertNotNull(answer); }
MCP部署方案
本地部署:适用于 stdio 传输方式,将 MCP服务打包后放在客户端可访问的路径下
远程部署:适用于 SSE 传输方式,部署为独立的Web 服务
Serverless部署:使用云函数等Serverless平台部署MCP服务,按需付费
练习 练习1:MCP客户端配置
1 2 3 4 5 6 spring: ai: mcp: client: stdio: servers-configuration: classpath:mcp-servers.json
1 2 3 4 5 6 7 8 9 10 11 12 13 14 15 { "mcpServers" : { "image-search" : { "command" : "java" , "args" : [ "-jar" , "path/to/image-search-mcp-server.jar" ] , "env" : { "API_KEY" : "your-api-key-here" } } } }
练习2:创建简单的MCP工具
1 2 3 4 5 6 7 8 9 10 11 12 13 14 15 16 17 18 19 20 21 22 23 24 25 26 27 28 29 30 31 32 @Service public class CalculatorService { @Tool(description = "计算两个数字的和") public double add ( @ToolParam(description = "第一个数字") double a, @ToolParam(description = "第二个数字") double b) { return a + b; } @Tool(description = "计算两个数字的乘积") public double multiply ( @ToolParam(description = "第一个数字") double a, @ToolParam(description = "第二个数字") double b) { return a * b; } } @SpringBootApplication public class CalculatorMcpApplication { public static void main (String[] args) { SpringApplication.run(CalculatorMcpApplication.class, args); } @Bean public ToolCallbackProvider calculatorTools (CalculatorService calculatorService) { return MethodToolCallbackProvider.builder() .toolObjects(calculatorService) .build(); } }
AI应用测试与部署 单元测试与集成测试实现 AI组件的单元测试
1 2 3 4 5 6 7 8 9 10 11 12 13 14 15 16 17 18 19 20 21 22 23 24 25 26 @SpringBootTest @AutoConfigureMockMvc public class ProductControllerIntegrationTest { @Autowired private MockMvc mockMvc; @MockBean private ChatClient chatClient; @Test public void testGenerateProductDescription () throws Exception { when (chatClient.call(any())).thenReturn( "这是一个AI生成的产品描述。" ); mockMvc.perform(post("/api/products/describe" ) .contentType(MediaType.APPLICATION_JSON) .content("{\"name\":\"代码小抄\",\"category\":\"开发工具\"}" )) .andExpect(status().isOk()) .andExpect(jsonPath("$.description" ).exists()) .andExpect(jsonPath("$.description" ).isString()); } }
AI应用的集成测试
1 2 3 4 5 6 7 8 9 10 11 12 13 14 15 16 17 18 19 20 21 22 23 24 25 26 @SpringBootTest @AutoConfigureMockMvc public class ProductControllerIntegrationTest { @Autowired private MockMvc mockMvc; @MockBean private ChatClient chatClient; @Test public void testGenerateProductDescription () throws Exception { when (chatClient.call(any())).thenReturn( "这是一个AI生成的产品描述。" ); mockMvc.perform(post("/api/products/describe" ) .contentType(MediaType.APPLICATION_JSON) .content("{\"name\":\"代码小抄\",\"category\":\"开发工具\"}" )) .andExpect(status().isOk()) .andExpect(jsonPath("$.description" ).exists()) .andExpect(jsonPath("$.description" ).isString()); } }
使用固定提示和响应集
1 2 3 4 5 6 7 8 9 10 11 12 13 14 15 16 17 18 19 @Test public void testProductRecommendations () { List<PromptResponsePair> testCases = loadTestCases("product_recommendations_test_cases.json" ); for (PromptResponsePair testCase : testCases) { when (chatClient.call(testCase.getPrompt())).thenReturn(testCase.getResponse()); ProductRecommendation recommendation = recommendationService.getRecommendation(testCase.getInput()); assertThat(recommendation).isNotNull(); assertThat(recommendation.getProducts().size()).isGreaterThan(0 ); } }
使用Mock对象进行测试 Mock对象对于 AI 应用测试尤为重要,因为可以:
消除对实际AI服务的依赖
创建可重复的测试环境
避免API调用费用
模拟特定的响应场景
1 2 3 4 5 6 7 8 9 10 11 12 13 14 15 16 17 18 19 20 21 22 23 24 25 26 27 28 29 30 31 32 33 34 35 36 37 38 39 40 41 42 43 44 45 46 47 48 49 50 51 52 53 54 55 56 @Configuration public class TestConfig { @Bean @Primary @Profile("test") public ChatClient mockChatClient () { Map<String, String> promptResponseMap = new HashMap <>(); promptResponseMap.put( "总结这篇文章" , "这是一篇关于Spring AI的文章。" ); promptResponseMap.put( "分析这段代码" , "这段代码实现了一个简单的排序算法。" ); return new MockChatClient (promptResponseMap); } } public class MockChatClient implements ChatClient { private final Map<String, String> promptResponseMap; public MockChatClient (Map<String, String> promptResponseMap) { this .promptResponseMap = promptResponseMap; } @Override public String call (String prompt) { if (promptResponseMap.containsKey(prompt)) { return promptResponseMap.get(prompt); } for (Map.Entry<String, String> entry : promptResponseMap.entrySet()) { if (prompt.contains(entry.getKey())) { return entry.getValue(); } } return "这是一个模拟响应。" ; } @Override public ChatResponse call (Prompt prompt) { } }
模拟特定场景
1 2 3 4 5 6 7 8 9 10 11 12 13 14 15 @Test public void testErrorHandling () { ChatClient errorChatClient = mock(ChatClient.class); when (errorChatClient.call(anyString())).thenThrow(new RuntimeException ("API 错误" )); ReflectionTestUtils.setField(aiService, "chatClient" , errorChatClient); assertThatThrownException(() -> aiService.generateContent("任何提示词" ) ).isInstanceOf(AIServiceException.class) .hasMessageContaining("调用 AI 服务失败" ); }
评估AI响应质量的方法 AI评估
1 2 3 4 5 6 7 8 9 10 11 12 13 14 15 16 17 18 19 20 21 22 23 24 25 26 27 28 29 30 31 32 33 34 35 36 37 38 39 40 41 42 43 @Service public class ResponseEvaluationService { private final ChatClient evaluationChatClient; public ResponseEvaluationService (ChatClient evaluationChatClient) { this .evaluationChatClient = evaluationChatClient; } public EvaluationResult evaluateResponse (String query, String response) { String evaluationPrompt = String.format(""" 请评估以下AI回答的质量。评分标准: 1. 相关性(1-10):回答与问题的相关程度 2. 准确性(1-10):回答中事实的准确性 3. 完整性(1-10):回答是否完整地解决了问题 4. 清晰度(1-10):回答的逻辑和表述是否清晰 问题:%s AI回答:%s 请提供四个评分和总体评价,格式为JSON: {"relevance": 分数, "accuracy": 分数, "completeness": 分数, "clarity": 分数, "comments": "评价"} """ , query, response); String evaluationJson = evaluationChatClient.call(evaluationPrompt); ObjectMapper mapper = new ObjectMapper (); try { return mapper.readValue(evaluationJson, EvaluationResult.class); } catch (Exception e) { throw new RuntimeException ("解析评估结果失败" , e); } } public record EvaluationResult ( int relevance, int accuracy, int completeness, int clarity, String comments ) {}}
人工评估
1 2 3 4 5 6 7 8 9 10 11 12 13 14 15 16 17 18 19 20 21 @Test @Tag("HumanReview") public void testContentGenerationQuality () { String prompt = "为编程导航网站写一个首页介绍" ; String generatedContent = aiService.generateContent(prompt); String filename = "content_evaluation_" + System.currentTimeMillis() + ".txt" ; try { Path filePath = Paths.get("target/human-review/" + filename); Files.createDirectories(filePath.getParent()); Files.write(filePath, (prompt + "\n\n" + generatedContent).getBytes()); System.out.println("需要人工评估的内容已保存到: " + filePath); } catch (IOException e) { fail("无法保存评估内容" , e); } }
SpringBoot应用的部署选项 Spring AI应用本质上是SpringBoot应用,可以采用多种部署方式:
传统服务器部署
1 2 3 4 5 mvn clean package java -jar target/spring-ai-app-1.0.0.jar
1 2 3 4 5 6 7 8 9 10 11 12 13 [Unit ] Description=Spring AI Application After=network.target [Service ] User=appuser WorkingDirectory=/opt/spring-ai-app ExecStart=/usr/bin/java -jar spring-ai-app-1.0.0.jar EnvironmentFile=/opt/spring-ai-app/config/env Restart=always [Install ] WantedBy=multi-user.target
Docker容器化部署
1 2 3 4 5 6 7 8 9 10 11 12 13 14 15 16 17 FROM eclipse-temurin:17 -jdkWORKDIR /app COPY target/spring-ai-app-1.0.0.jar app.jar HEALTHCHECK --interval=30s --timeout =3s \ CMD curl -f http://localhost:8080/actuator/health || exit 1 ENV SPRING_PROFILES_ACTIVE=prodENV SERVER_PORT=8080 EXPOSE 8080 ENTRYPOINT ["java" , "-jar" , "app.jar" ]
1 2 3 4 5 6 7 8 docker build -t spring-ai-app:1.0.0 . docker run -d -p 8080:8080 \ -e OPENAI_API_KEY=your-api-key \ --name spring-ai-app \ spring-ai-app:1.0.0
Kubernetes部署
1 2 3 4 5 6 7 8 9 10 11 12 13 14 15 16 17 18 19 20 21 22 23 24 25 26 27 28 29 30 31 32 33 34 35 36 37 38 39 40 41 42 43 44 45 46 apiVersion: apps/v1 kind: Deployment metadata: name: spring-ai-app spec: replicas: 3 selector: matchLabels: app: spring-ai-app template: metadata: labels: app: spring-ai-app spec: containers: - name: spring-ai-app image: spring-ai-app:1.0.0 ports: - containerPort: 8080 env: - name: SPRING_PROFILES_ACTIVE value: "prod" - name: OPENAI_API_KEY valueFrom: secretKeyRef: name: ai-secrets key: openai-api-key resources: requests: memory: "512Mi" cpu: "500m" limits: memory: "1Gi" cpu: "1000m" livenessProbe: httpGet: path: /actuator/health/liveness port: 8080 initialDelaySeconds: 60 periodSeconds: 30 readinessProbe: httpGet: path: /actuator/health/readiness port: 8080 initialDelaySeconds: 30 periodSeconds: 10
创建服务
1 2 3 4 5 6 7 8 9 10 11 apiVersion: v1 kind: Service metadata: name: spring-ai-app spec: selector: app: spring-ai-app ports: - port: 80 targetPort: 8080 type: LoadBalancer
云平台部署
监控与日志管理 Spring Boot Actuator集成
1 2 3 4 <dependency > <groupId > org.springframework.boot</groupId > <artifactId > spring-boot-starter-actuator</artifactId > </dependency >
配置Actuator:
1 2 3 4 5 6 7 8 9 management.endpoints.web.exposure.include=* management.endpoint.health.show-details=always management.endpoint.metrics.enabled=true management.endpoint.prometheus.enabled=true
自定义AI特定指标
1 2 3 4 5 6 7 8 9 10 11 12 13 14 15 16 17 18 19 20 21 22 23 24 25 26 27 28 29 30 31 32 33 34 35 36 37 38 39 40 41 42 43 44 @Component public class AiServiceMetrics { private final MeterRegistry registry; public AiServiceMetrics (MeterRegistry registry) { this .registry = registry; } public void recordRequest (String modelName, String operationType) { registry.counter("ai.request.count" , "model" , modelName, "operation" , operationType ).increment(); } public Timer.Sample startTimer () { return Timer.start(registry); } public void stopTimer (Timer.Sample sample, String modelName, String operationType) { sample.stop(registry.timer("ai.response.time" , "model" , modelName, "operation" , operationType )); } public void recordTokenUsage (String modelName, int promptTokens, int completionTokens) { registry.counter("ai.tokens.prompt" , "model" , modelName).increment(promptTokens); registry.counter("ai.tokens.completion" , "model" , modelName).increment(completionTokens); registry.counter("ai.tokens.total" , "model" , modelName).increment(promptTokens + completionTokens); } public void recordError (String modelName, String errorType) { registry.counter("ai.error.count" , "model" , modelName, "error" , errorType ).increment(); } }
使用AOP实现自动指标收集
1 2 3 4 5 6 7 8 9 10 11 12 13 14 15 16 17 18 19 20 21 22 23 24 25 26 27 28 29 30 31 32 33 34 35 36 37 38 39 40 41 42 43 44 45 46 47 48 49 50 51 52 53 54 55 @Aspect @Component public class AiServiceMonitoringAspect { private final AiServiceMetrics metrics; public AiServiceMonitoringAspect (AiServiceMetrics metrics) { this .metrics = metrics; } @Around("execution(* org.springframework.ai.chat.ChatClient.call(..)) || " + "execution(* org.springframework.ai.image.ImageClient.generateImage(..))") public Object monitorAiCalls (ProceedingJoinPoint joinPoint) throws Throwable { String methodName = joinPoint.getSignature().getName(); String modelName = determineModelName(joinPoint); metrics.recordRequest(modelName, methodName); Timer.Sample timer = metrics.startTimer(); try { Object result = joinPoint.proceed(); if (result instanceof ChatResponse response) { Usage usage = response.getUsage(); if (usage != null ) { metrics.recordTokenUsage( modelName, usage.getPromptTokens(), usage.getCompletionTokens() ); } } return result; } catch (Exception e) { metrics.recordError(modelName, e.getClass().getSimpleName()); throw e; } finally { metrics.stopTimer(timer, modelName, methodName); } } private String determineModelName (ProceedingJoinPoint joinPoint) { return "default" ; } }
结构化日志记录
1 2 3 4 5 6 7 8 9 10 11 12 13 14 15 16 17 18 19 20 21 22 23 24 25 26 27 28 29 30 31 32 33 34 35 36 37 38 39 40 41 42 43 44 45 46 47 48 49 50 @Slf4j @Service public class LoggingAiClient implements ChatClient { private final ChatClient delegate; public LoggingAiClient (ChatClient delegate) { this .delegate = delegate; } @Override public String call (String prompt) { String requestId = UUID.randomUUID().toString(); log.info("AI请求开始 [requestId={}] prompt='{}'" , requestId, truncate(prompt, 100 )); long startTime = System.currentTimeMillis(); String response = null ; try { response = delegate.call(prompt); log.info("AI请求成功 [requestId={}, duration={}ms] response='{}'" , requestId, System.currentTimeMillis() - startTime, truncate(response, 100 )); return response; } catch (Exception e) { log.error("AI请求失败 [requestId={}, duration={}ms] error='{}'" , requestId, System.currentTimeMillis() - startTime, e.getMessage(), e); throw e; } } private String truncate (String text, int maxLength) { if (text != null && text.length() > maxLength) { return text.substring(0 , maxLength) + "..." ; } return text; } }
AI应用性能优化 AI应用性能的关键指标 响应时间是最直观的指标,包括首字节时间(TTFB)和完整响应时间。
1 2 3 4 5 6 7 8 9 10 11 12 13 14 15 16 17 18 19 20 21 22 23 24 25 26 27 28 29 30 31 32 33 34 @Component public class PerformanceMonitor { private final MeterRegistry meterRegistry; public PerformanceMonitor (MeterRegistry meterRegistry) { this .meterRegistry = meterRegistry; } public void recordAiRequestTime (String modelType, long duration) { Timer.Sample sample = Timer.start(meterRegistry); sample.stop(Timer.builder("ai.request.duration" ) .tag("model" , modelType) .register(meterRegistry)); } public void recordTokenUsage (String operation, int tokenCount) { Counter.builder("ai.tokens.used" ) .tag("operation" , operation) .register(meterRegistry) .increment(tokenCount); } public void recordCacheHit (String cacheType, boolean hit) { Counter.builder("ai.cache.requests" ) .tag("type" , cacheType) .tag("result" , hit ? "hit" : "miss" ) .register(meterRegistry) .increment(); } }
缓存策略与实现 缓存可以很大程度的提升AI应用性能。
1 2 3 4 5 6 7 8 9 10 11 12 13 14 15 16 17 18 19 20 21 22 23 24 25 26 27 28 29 30 31 @Service public class AiCacheService { private final RedisTemplate<String, String> redisTemplate; private final ChatClient chatClient; public AiCacheService (RedisTemplate<String, String> redisTemplate, ChatClient chatClient) { this .redisTemplate = redisTemplate; this .chatClient = chatClient; } public String getCachedResponse (String question) { String cacheKey = "ai:response:" + DigestUtils.md5DigestAsHex(question.getBytes()); String cachedResponse = redisTemplate.opsForValue().get(cacheKey); if (cachedResponse != null ) { return cachedResponse; } String response = chatClient.prompt().user(question).call().content(); redisTemplate.opsForValue().set(cacheKey, response, Duration.ofHours(24 )); return response; } }
批处理与并行请求 批处理能够提高系统吞吐量,而并行处理则能缩短总体响应时间。
1 2 3 4 5 6 7 8 9 10 11 12 13 14 15 16 17 18 19 20 21 22 23 24 25 26 27 28 29 30 31 32 33 34 35 36 37 38 39 40 41 @Service public class BatchProcessingService { private final ChatClient chatClient; private final ExecutorService executorService; public BatchProcessingService (ChatClient chatClient) { this .chatClient = chatClient; this .executorService = Executors.newFixedThreadPool(10 ); } public List<String> processBatch (List<String> questions) { List<CompletableFuture<String>> futures = questions.stream() .map(question -> CompletableFuture.supplyAsync(() -> chatClient.prompt().user(question).call().content(), executorService)) .collect(Collectors.toList()); return futures.stream() .map(CompletableFuture::join) .collect(Collectors.toList()); } public void processLargeDataset (List<String> data, int batchSize) { for (int i = 0 ; i < data.size(); i += batchSize) { List<String> batch = data.subList(i, Math.min(i + batchSize, data.size())); processBatch(batch); try { Thread.sleep(1000 ); } catch (InterruptedException e) { Thread.currentThread().interrupt(); break ; } } } }
响应流处理技术 流式响应能够提供更好的用户体验,让用户能够实时看到AI的回答过程。
1 2 3 4 5 6 7 8 9 10 11 12 13 14 15 16 17 18 19 20 21 22 23 24 25 26 27 28 29 30 31 32 33 34 35 36 37 38 39 40 41 42 43 44 45 @RestController public class StreamingController { private final ChatClient chatClient; public StreamingController (ChatClient chatClient) { this .chatClient = chatClient; } @GetMapping(value = "/stream-chat", produces = MediaType.TEXT_EVENT_STREAM_VALUE) public Flux<String> streamChat (@RequestParam String question) { return chatClient.prompt().user(question).stream().content() .map(response -> "data: " + response + "\n\n" ) .onErrorReturn("data: [ERROR] 处理请求时发生错误\n\n" ); } @GetMapping("/sse-chat") public SseEmitter sseChat (@RequestParam String question) { SseEmitter emitter = new SseEmitter (30000L ); CompletableFuture.runAsync(() -> { try { chatClient.prompt().user(question).stream().content() .subscribe( chunk -> { try { emitter.send(SseEmitter.event() .name("message" ) .data(chunk)); } catch (IOException e) { emitter.completeWithError(e); } }, emitter::completeWithError, emitter::complete ); } catch (Exception e) { emitter.completeWithError(e); } }); return emitter; } }
资源使用优化 合理的资源管理能够提高系统稳定性并降低成本。
1 2 3 4 5 6 7 8 9 10 11 12 13 14 15 16 17 18 19 20 21 22 23 24 25 26 27 28 29 30 31 32 33 34 35 36 37 38 39 40 41 42 43 44 45 46 47 48 49 50 51 52 53 54 55 56 57 58 59 60 61 62 63 64 65 66 67 68 69 70 71 72 73 74 75 76 77 78 79 80 81 82 83 84 85 @Configuration public class AiOptimizationConfig { @Bean public RestTemplate restTemplate () { HttpComponentsClientHttpRequestFactory factory = new HttpComponentsClientHttpRequestFactory (); CloseableHttpClient httpClient = HttpClients.custom() .setMaxConnTotal(100 ) .setMaxConnPerRoute(20 ) .setConnectionTimeToLive(30 , TimeUnit.SECONDS) .build(); factory.setHttpClient(httpClient); factory.setConnectTimeout(5000 ); factory.setReadTimeout(30000 ); return new RestTemplate (factory); } @Bean public TaskExecutor aiTaskExecutor () { ThreadPoolTaskExecutor executor = new ThreadPoolTaskExecutor (); executor.setCorePoolSize(5 ); executor.setMaxPoolSize(20 ); executor.setQueueCapacity(100 ); executor.setThreadNamePrefix("ai-task-" ); executor.setRejectedExecutionHandler(new ThreadPoolExecutor .CallerRunsPolicy()); executor.initialize(); return executor; } } @Service public class ResourceOptimizedAiService { private final ObjectPool<StringBuilder> stringBuilderPool; public ResourceOptimizedAiService () { this .stringBuilderPool = new GenericObjectPool <>( new BasePooledObjectFactory <StringBuilder>() { @Override public StringBuilder create () { return new StringBuilder (); } @Override public PooledObject<StringBuilder> wrap (StringBuilder obj) { return new DefaultPooledObject <>(obj); } @Override public void passivateObject (PooledObject<StringBuilder> p) { p.getObject().setLength(0 ); } } ); } public String processWithOptimization (String input) { StringBuilder sb = null ; try { sb = stringBuilderPool.borrowObject(); sb.append("处理编程导航用户请求: " ).append(input); return sb.toString(); } catch (Exception e) { throw new RuntimeException ("资源获取失败" , e); } finally { if (sb != null ) { try { stringBuilderPool.returnObject(sb); } catch (Exception e) { } } } } }
第六次实践 优化高流量AI应用性能
1 2 3 4 5 6 7 8 9 10 11 12 13 14 15 16 17 18 19 20 21 22 23 24 25 26 27 28 29 30 31 32 33 34 35 36 37 38 39 40 41 42 43 44 45 46 47 48 49 50 51 52 53 54 55 56 57 58 59 60 61 62 63 64 65 66 67 68 69 70 71 72 73 74 75 76 77 78 79 @RestController @RequestMapping("/api/optimized") public class OptimizedAiController { private final AiCacheService cacheService; private final CostControlService costControlService; private final PerformanceMonitor performanceMonitor; private final ChatClient chatClient; @PostMapping("/chat") public ResponseEntity<?> optimizedChat(@RequestBody ChatRequest request) { long startTime = System.currentTimeMillis(); try { if (!costControlService.checkTokenLimit(request.getUserId(), estimateTokens(request.getQuestion()))) { return ResponseEntity.status(429 ) .body("今日 Token 使用量已达上限,请明天再试或升级为面试鸭 VIP" ); } String cachedResponse = cacheService.getCachedResponse(request.getQuestion()); if (cachedResponse != null ) { performanceMonitor.recordCacheHit("semantic" , true ); return ResponseEntity.ok(new ChatResponse (cachedResponse, true )); } String selectedModel = costControlService.selectOptimalModel( request.getQuestion(), request.getUserId()); String response = chatClient.prompt().user(request.getQuestion()).call().content(); long duration = System.currentTimeMillis() - startTime; performanceMonitor.recordAiRequestTime(selectedModel, duration); performanceMonitor.recordCacheHit("semantic" , false ); return ResponseEntity.ok(new ChatResponse (response, false )); } catch (Exception e) { return ResponseEntity.status(500 ) .body("处理请求时发生错误: " + e.getMessage()); } } private int estimateTokens (String text) { return (int ) Math.ceil(text.length() / 3.0 ); } } class ChatRequest { private String question; private String userId; public String getQuestion () { return question; } public void setQuestion (String question) { this .question = question; } public String getUserId () { return userId; } public void setUserId (String userId) { this .userId = userId; } } class ChatResponse { private String answer; private boolean fromCache; public ChatResponse (String answer, boolean fromCache) { this .answer = answer; this .fromCache = fromCache; } public String getAnswer () { return answer; } public boolean isFromCache () { return fromCache; } }

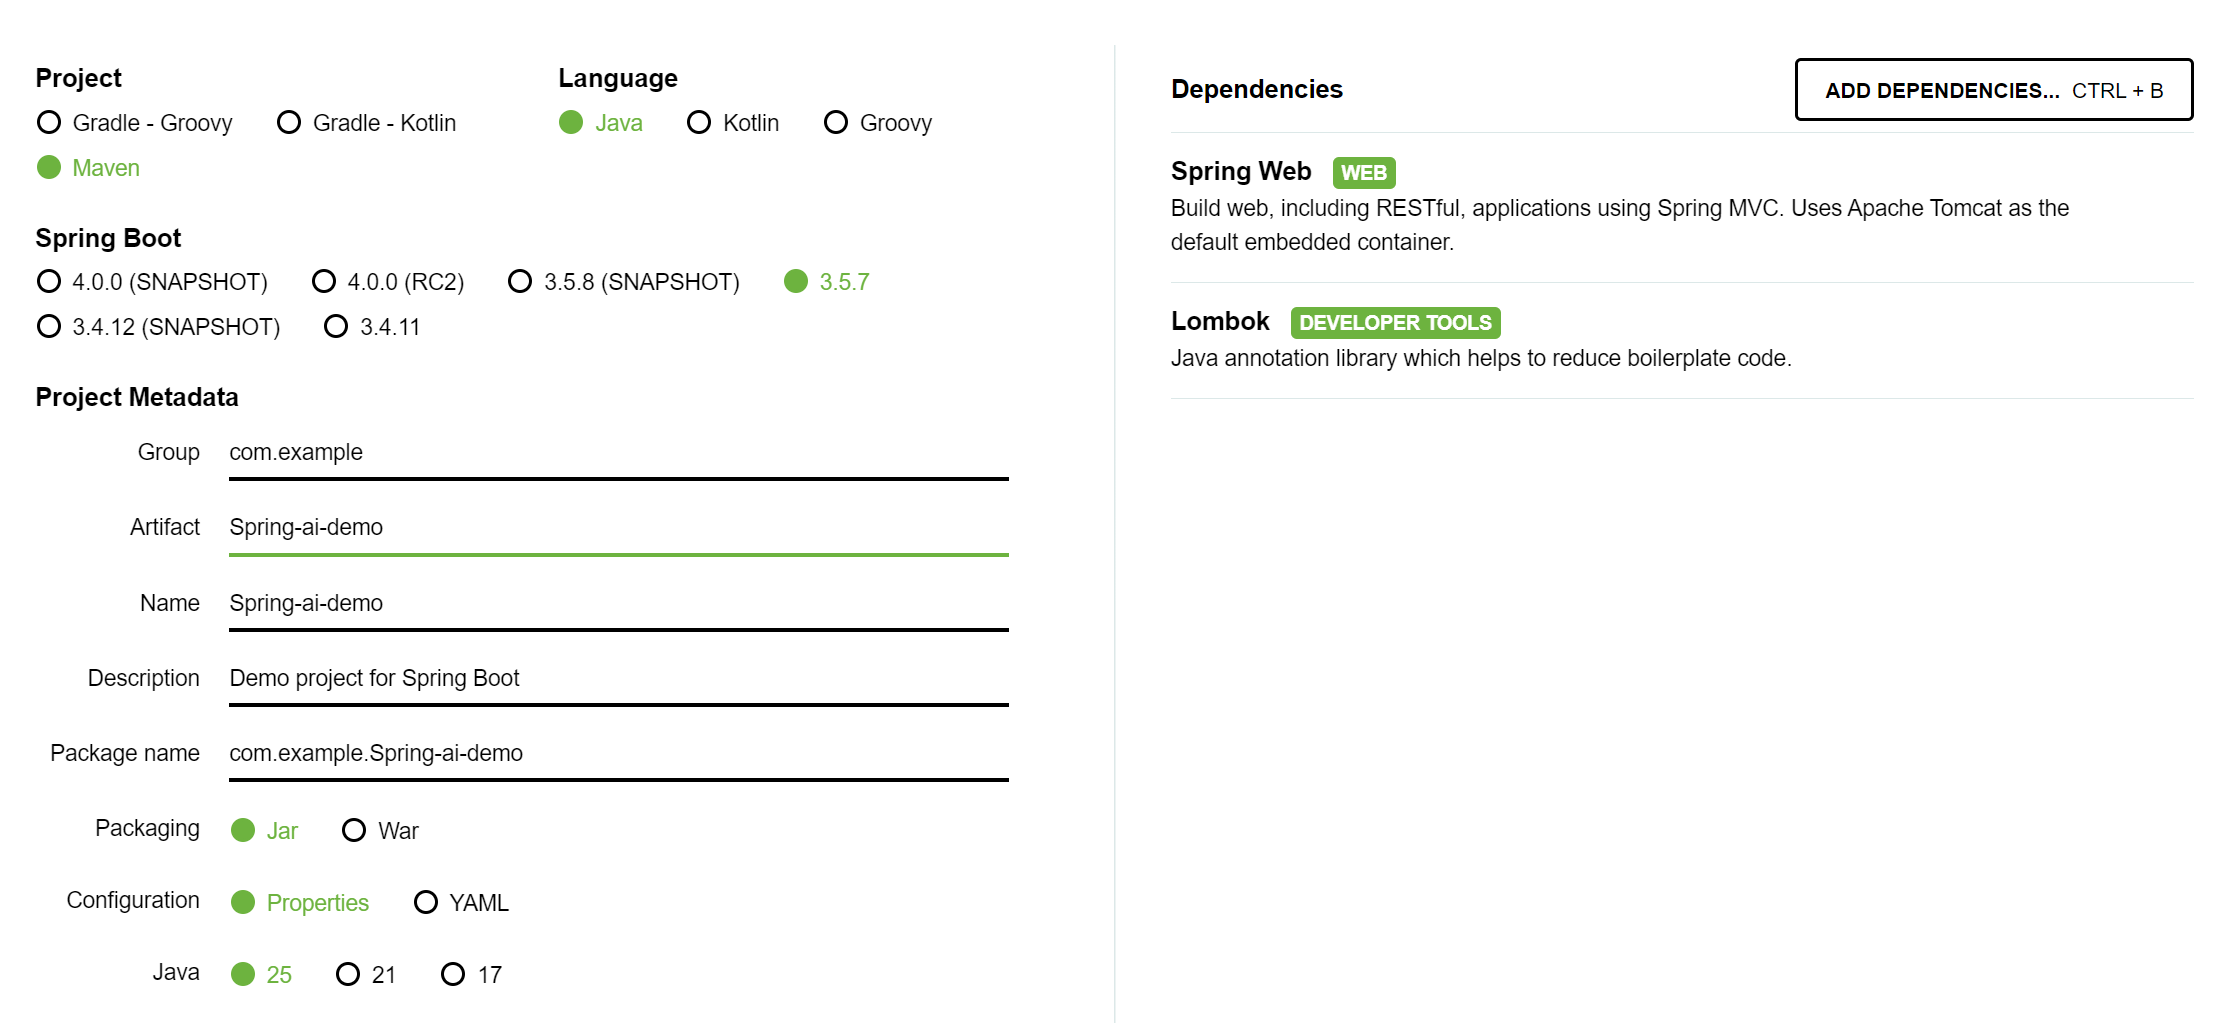
 微信
微信 支付宝
支付宝